FreeBSD
Contents
- Why FreeBSD
- Critical System and Applications
- Inventory Survey
- Memory, CPU, PCI Bus
- Installing a New Version of BSD
- Boot Manager and Partitions
- System No Boot Fully and No Signal to Monitor
- Reset BIOS Setup Admin Password on Dell
- BIOS error 0271 check date and time settings
- Halt Reboot
- DHCP
- DHCP Client Troubleshooting
- Static IP Address
- Packages and Ports
- FTP a New Version of XFree86
- Configuring XFree86
- Tab Window Manager
- .xinitrc
- .Xdefaults
- Editing the XF86Config file in /etc/X11
- /var/log/XF86Config.log
- FreeBSD Device Discovery Log
- TCP Listening
- SSH + X into a Company from Home BSD
- SSH Addition to .twmrc
- Remote Applications
- Manually Add an Xhost
- Window Geometry and Placement
- Sound Support via a New Kernel
- Slice Methodology
- Package Won’t Kick Off
- Readability Check
- NFS Mounted File Systems
- Mounting CDROM File System
- Configuring xmcd for Playing Audio CDs
- Installing a New Ethernet NIC
- DNS Resolution
- Shell Scripting
- CPU
- Partitions and Disk Usage
- Fstab for MSDOS Mounting
- Windows Killed Boot Manager
- Custom Kernel
- PS/2 Mouse Problems
- Ripping CDs
- Using fvwm2 instead of twm
- CD Burning
- Mounting a Second Hard Drive for Backups
- NTP
- HTTPD ServerName Lookup Problems
- Sendmail Disable
- Fonts
- Compiler
- CSH Shell
- SMTP
- vi recover sessions
- FreeBSD Newbie Sites
- Network Printing
- User Accounts
Why FreeBSD
Compared to Linux, FreeBSD is coherent. There are too many people screwing with Linux. You never really know what you’ll get in a Linux release. The development of FreeBSD is preceded over by “The Core Team.” They are experienced engineers who sign off on features and fixes. Some engineers view Linux as a mess. Linux release numbers don’t mean anything. The redhat people have made an art of having incompatible libraries from one release to the next. Linux is not good work. Running Linux Redhat in the workplace is a big mistake.
Linux version warning. Redhat cowboys make an art-form of packaging incompatible run-time libraries in every minor release. If you have trouble with shared libraries on a compute server after the changes, you can almost always work around them if you compile, link, and run using what you’ll find with /usr/bin/gcc on your compute server rather than /tools/bin/gcc.
Critical System and Applications
- System Files
/etc/rc.conf
/etc/hosts
/etc/resolv.conf
- Applications
~/.emacs
~/.vm
~/.initrc
~/.Xdefaults
~/.twmrc
/etc/X11/XF86Config
Inventory Survey
Before installing FreeBSD, take an inventory of all the installed devices: disk types, controllers, network cards, monitor (and recommended resolution and color display bits), soundcard, video card, modems.
The easiest way to find this information is to look at the boot messages in /var/log/messages. Enter “vi /var/log/messages”. After the file opens, go to the end of it by entering a capital G. It’s better to go to the latest events then scroll backward. Go to the moment that I last booted the machine. Scroll back until I see the copyrights for the Univ of Calif. That’s the beginning. That’s the beginning of the boot sequence.
‘dmesg’ shows the bootup messages, which provide some info.
On a Linux system, you can retrieve system info in the following locations (there’s no simple way to list all of it):
Look in the /proc directory. For PCI devices like VGA and controllers, see “cat /proc/pci”
For memory, see “cat /proc/meminfo”
For CPU, see “cat /proc/cpuinfo”
Following were some of the settings for Greg’s Dell laptop:
LCD 15” Hitachi SXGA, recommended resolution is 1400 X 1050. 32-bit color. It is possible for me to screw up my video hardware by stretching it beyond it’s recommended limits. Be cautious!
Graphic controller ATI Mobility 16 MB
Net card Actiontec 82559-based mini PCI Ethernet Adaptor 10/100
Sound card ESS Technology Maestro3 (ESS Maestro PCI Audio wdm)
Memory, CPU, PCI Bus
Memory
$ grep memory /var/run/dmesg.boot

real memory  = 201326592 (192 MB)
avail memory = 182050816 (173 MB)
Usage:
$ top

CPU:  0.4% user,  0.0% nice,  0.7% system,  0.0% interrupt, 98.9% idle
Mem: 19M Active, 12M Inact, 20M Wired, 700K Cache, 18M Buf, 125M Free
Swap: 512M Total, 3084K Used, 509M Free
CPU
$ sysctl hw.model hw.machine hw.ncpu
hw.model: Pentium II/Pentium II Xeon/Celeron
hw.machine: i386
hw.ncpu: 1
Is the CPU 32bit or 64?
$ getconf LONG_BIT
32
$ dmesg | grep CPU
CPU: Pentium II/Pentium II Xeon/Celeron (233.35-MHz 686-class CPU)
PCI bus
Info about the PCI bus and devices on FreeBSD? See the vendor names.
$ pciconf -lv
hostb0@pci0:0:0:0:  class=0x060000 card=0x00000000 chip=0x71808086 rev=0x03 hdr=0x00
    vendor     = 'Intel Corporation'
    device     = '440LX/EX - 82443LX/EX Host bridge'
    class      = bridge
    subclass   = HOST-PCI
pcib1@pci0:0:1:0:   class=0x060400 card=0x00000000 chip=0x71818086 rev=0x03 hdr=0x01
    vendor     = 'Intel Corporation'
    device     = '440LX/EX - 82443LX/EX AGP bridge'
    class      = bridge
    subclass   = PCI-PCI
isab0@pci0:0:7:0:   class=0x060100 card=0x00000000 chip=0x71108086 rev=0x02 hdr=0x00
    vendor     = 'Intel Corporation'
    device     = '82371AB/EB/MB PIIX4 ISA'
    class      = bridge
    subclass   = PCI-ISA
atapci0@pci0:0:7:1: class=0x010180 card=0x00000000 chip=0x71118086 rev=0x01 hdr=0x00
    vendor     = 'Intel Corporation'
    device     = '82371AB/EB/MB PIIX4 IDE'
    class      = mass storage
    subclass   = ATA
uhci0@pci0:0:7:2:   class=0x0c0300 card=0x00000000 chip=0x71128086 rev=0x01 hdr=0x00
    vendor     = 'Intel Corporation'
    device     = '82371AB/EB/MB PIIX4 USB'
    class      = serial bus
    subclass   = USB
piix0@pci0:0:7:3:   class=0x068000 card=0x00000000 chip=0x71138086 rev=0x02 hdr=0x00
    vendor     = 'Intel Corporation'
    device     = '82371AB/EB/MB PIIX4 ACPI'
    class      = bridge
sis0@pci0:0:14:0:   class=0x020000 card=0xf3121385 chip=0x0020100b rev=0x00 hdr=0x00
    vendor     = 'National Semiconductor Corporation'
    device     = 'DP83815 (MacPhyter) Ethernet Controller'
    class      = network
    subclass   = ethernet
vgapci0@pci0:1:0:0: class=0x030000 card=0x01521092 chip=0x3d07104c rev=0x01 hdr=0x00
    vendor     = 'Texas Instruments'
    device     = 'TVP4020 [Permedia 2]'
    class      = display
    subclass   = VGA
Boot Manager and Partitions
Use Partition Magic to partition the hard drive. That is, tell Windows it does not own the entire disk on the computer.
Before FreeBSD, there is one partition on the disk, and DOS owns that partition. Get DOS into its own partition before the FreeBSD install program is run. Windows can only win if it is allowed to.
If you ever use Partition Magic to reallocate MB between partitions on the fly, be sure the system is completely idle.
Always install Windows first on one partition before installing FreeBSD on the other partition. The FreeBSD Boot Manager can function with Windows. However, the Window’s manager can’t function with FreeBSD.
For a dual boot system with Windows, always install Windows before FreeBSD. Windows does not know how to operate with another onboard OS. FreeBSD’s boot manager will overwrite the Window’s boot manager because FreeBSD has the intelligence to know it’s not the only OS in the world.
The FreeBSD manager overwrites the Windows boot manager. Be sure to install FreeBSD’s Boot Manager. Upon boot up, the FreeBSD boot loader will look at my disk and discovery any bootable disk partitions. It’ll offer me a menu that says hit F1 for DOS, F2 for FreeBSD, … After 10 seconds, the loader will default to the last command it was told.
Note: As an alternative to Partition Magic, use fdisk to partition my hard drive.
System No Boot Fully and No Signal to Monitor
Symptoms:
- Power supply not booting up PC
- Power supply small power detection (4v) to motherboard pin connector
- No signal to monitor
- Hard disk making noise but no full boot
- Eth0 nic card LED is on
Root cause:
- Dust and black soot buildup on RAM sticks
Solution:
- Remove each RAM stick and remove dust with a brush
- Use a pencil eraser to rub off the black soot on all the contact points on the RAM sticks. This is what fixed the problem.
This video solved it with eraser tip, https://www.youtube.com/watch?v=F-dLBIomghY
See also for good power troubleshooting:
-
https://www.youtube.com/watch?v=nfYwKPtDiw4
-
https://www.warzone.org/2022/09/19/dell-pentium-pro-restoration-part-1a-the-power-supply/
Reset BIOS Setup Admin Password on Dell
http://www.dell.com/support/Article/us/en/04/575822/EN
-
Power off system
-
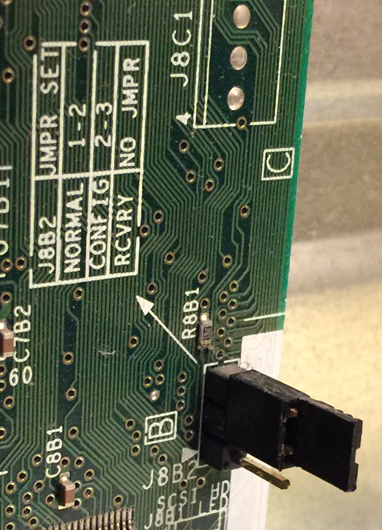
On motherboard in the bottom right corner, there is a black plastic jumper. Move it to the configuration position (to the 2-3 pin position). This will boot the system with the factory default BIOS settings (no admin password set).
-
Power on system
-
Look for this boot message:
Entering Configuration Mode ….
-
System enters BIOS Setup. On the Maintenance tab, select:
Clear All Passwords > Enter > Clear All Passwords? > Yes > F10
-
Return jumper back to normal position
-
Power down system
-
Power on system
BIOS error 0271 check date and time settings
http://www.techsupportforum.com/forums/f108/solved-dell-inspiron-error-0271-and-0251-a-498037.html
-
Replace the CMOS battery on the motherboard
-
Enter BIOS Setup
-
Set correct date and time
-
F10
Halt Reboot
sync;halt
sync;reboot
The “;” is just a command separator. You could also enter “sync”, Return, then “halt”. After entering “sync;halt”, just press the power button to turn off the machine.
To reboot, you must be “root”. However, first enter “sync;”. Reason: When you write to a disk, it does not go all the way to the disk. It goes into buffers and memory. Eventually, it finds its way out to the disk. The “sync” command takes all the stuff that is cached in the buffers and kernel and pushes it out now. Do this to put everything into a consistent state.
One of the ways a highly evolved operating system gets to be fast is by doing updates to relatively slow media asynchronously. When you say write this file, the system tells you its done. But it’s not really done. The system sent the operation on its way.
The LAST THING YOU WANT TO DO, IS POWER THE MACHINE OFF. When taking the machine down, need to push out the pending operations (runs). This is why when the power goes off, some machines take a long time to come back up.
The “;” is just a command separator. I could also just enter “sync”, Return, then “halt”. I need to be “root” to do this.
After entering “sync;halt”, just press the power button to turn off the machine.
DHCP
To enable:
-
Identify the interface name of the Ethernet port by using
dmesg:$ dmesg | more ... sis0: <NatSemi DP8381[56] 10/100BaseTX> port 0xf800-0xf8ff mem 0xfedff000-0xfedfffff irq 9 at device 14.0 on pci0The name is
sis0in this example. -
Go to
/etc/rc.confand enableDHCP:ifconfig_sis0="DHCP" -
Restart the system:
sync;reboot -
On system bootup, the interface will be assigned an IP address from the DHCP IP pool. Issue
ifconfigto see the address:$ ifconfig sis0: flags=8843<UP,BROADCAST,RUNNING,SIMPLEX,MULTICAST> metric 0 mtu 1500 options=83808<VLAN_MTU,WOL_UCAST,WOL_MCAST,WOL_MAGIC,LINKSTATE> ether 00:a0:cc:a0:e0:ce inet 10.0.0.176 netmask 0xffffff00 broadcast 10.0.0.255 nd6 options=29<PERFORMNUD,IFDISABLED,AUTO_LINKLOCAL> media: Ethernet autoselect (100baseTX <full-duplex>) status: active -
If see
status: activein ifconfig’s display, that means the Ethernet cable’s Layer 2 link is working.
DHCP Client Troubleshooting
Tip. If config looks correct, go to Xfinity router login and check if hostname “bsd” is being discovered. Clicking on the hostname’s details in GUI resolved a mysterious connectivity problem once before. DHCP woke up.
See Connected Devices > Devices > bsd

Enter this to request an IP address and name server from the remote DHCP server:
dhclient <interface-name>
Then, ping a device on the network for verification. Go into /stand/sysinstall and tell the networking program to enable DHCP on fxp0. The configuration info gets stored in /etc/rc.conf
Enter “ifconfig” to display the
To shutdown an interface, enter “ifconfig fxp0 down”. If you unplug the Ethernet cable without doing this, might get some console messages about the network being down.
A.
Do this if dhcpclient is not releasing an old IP address:
kill `cat /var/run/dhclient.pid`
ifconfig fxp0 down
dhclient fxp0
Alternatively, do this:
ps aux | grep dhclient
kill <pid>
B.
dhclient keeps track of a history of IP addresses and hosts that got you on the network in the past. If dhclient fxp0 fails, dhclient will look in /var/db/dhclient.leases to get an assignment that worked in the past.
To look at this dhclient Data Base, see /var/db/dhclient.leases
C.
A healthy set of /etc/hosts and /etc/resolve.config looks like this:
greg-pc# cat /etc/hosts
127.0.0.1 localhost.procket.com localhost
greg-pc# cat /etc/resolve.config
search
Static IP Address
Insert the following into /etc/rc.conf:
ifconfig_sis0="inet 192.168.1.101/24"
defaultrouter="192.168.1.1"
inetd_enable="YES"
LinkSys is the default router, and here is what “ifconfig” looks like:
sis0: flags=8843<UP,BROADCAST,RUNNING,SIMPLEX,MULTICAST> metric 0 mtu 1500
  options=83808<VLAN_MTU,WOL_UCAST,WOL_MCAST,WOL_MAGIC,LINKSTATE>
  ether 00:a0:cc:a0:e0:ce
  inet 192.168.1.110 netmask 0xffffff00 broadcast 192.168.1.255
  nd6 options=29<PERFORMNUD,IFDISABLED,AUTO_LINKLOCAL>
  media: Ethernet autoselect (100baseTX <full-duplex>)
  status: active
Then, restart inetd service:
/etc/rc.d/netif start
https://www.cyberciti.biz/tips/freebsd-how-to-start-restart-stop-network-service.html
Packages and Ports
FreeBSD offers two primary methods of downloading applications and system tools:
- Packages
- Ports
Users will have to choose between the two collections when installing these tools. Packages are pre-compiled binary packages, typically smaller in size than full port installations and they do not require compilation time. However, ports are a much more customizable option, allowing users to directly interact with the build process and configure the application to their preference. Additionally, installing an application from a port can help a user understand how the application is compiled, configured, and finally built into a binary. It can be a very rewarding process!
The Ports Collection
Find ports here.
Use the portsnap method as described here.
No support. If get this error during a port install, it’s time to upgrade the base OS to a new version. If I don’t want to upgarde, then try downloading binaries using the pkg command:
[greg@bsd ~]$ cd /usr/ports/ports-mgmt/pkg
[greg@bsd /usr/ports/ports-mgmt/pkg]$ make install
/!\ ERROR: /!\

Ports Collection support for your FreeBSD version has ended, and no ports are
guaranteed to build on this system. Please upgrade to a supported release.
pkg
pkg is the next generation replacement for the traditional FreeBSD package management tools. Do not use pkg_*; it’s deprecated.
Total installed packages on my local system:
# pkg -N
pkg: 142 packages installed
Package list details:
# pkg info
Details about a specific package:
# pkg info python
python-2.7_2,2
Name           : python
Version        : 2.7_2,2
Installed on   : Fri Feb 19 03:00:39 2016 PST
Origin         : lang/python
Architecture   : freebsd:10:x86:32
Prefix         : /usr/local
Categories     : python lang ipv6
Licenses       :
Maintainer     : python@FreeBSD.org
WWW            : http://www.python.org/
Comment        : The "meta-port" for the default version of Python interpreter
Annotations    :
  repo_type      : binary
  repository     : FreeBSD
Flat size      : 38.0B
Description    :
Python is an interpreted object-oriented programming language, and is
often compared to Tcl, Perl or Scheme.
This is a meta port to the Python interpreter and provides symbolic links
to bin/python, bin/pydoc, bin/idle and so on to allow compatibility with
version agnostic python scripts.

WWW: http://www.python.org/
Search for packages on the remote repository:
# pkg search sqlite3
sqlite3-3.25.1                 SQL database engine in a C library
...
Install a new package from the remote repository:
# pkg install sqlite3-3.8.10.2
Updating FreeBSD repository catalogue...
FreeBSD repository is up-to-date.
All repositories are up-to-date.
Checking integrity... done (0 conflicting)
The following 1 package(s) will be affected (of 0 checked):

New packages to be INSTALLED:
  sqlite3: 3.8.10.2

The process will require 3 MiB more space.

Proceed with this action? [y/N]: y
[1/1] Installing sqlite3-3.8.10.2...
[1/1] Extracting sqlite3-3.8.10.2: 100%
To delete a package:
pkg delete python34-3.4.3_1
See Installing Applications: Packages and Ports
Undefined symbol “utimensat”
Hit this error during a pkg install:
0%/usr/local/lib/libpkg.so.4: Undefined symbol "utimensat"
See full issue description and this one
The solution is to do a full OS upgrade to a supported version. However as a tmp workaround, edit the FreeBSD.conf to point to the release_2 repo for my supported version (FreeBSD 10.2-RELEASE as displayed by dmesg).
cd /usr/local/etc/pkg/repos
cp /etc/pkg/FreeBSD.conf .
vi FreeBSD.conf
change quarterly to release_2 in the url:
FreeBSD: {
  url: "pkg+http://pkg.FreeBSD.org/${ABI}/release_2",
  mirror_type: "srv",
  signature_type: "fingerprints",
  fingerprints: "/usr/share/keys/pkg",
  enabled: yes
}
Confirm the new url is used by pkg:
# pkg -vv
Delete all the files (FreeBSD.meta, local.sqlite, …) in /pkg:
cd /var/db/pkg/
rm *.*
Reinstall pkg:
# pkg install pkg
# pkg --version
1.5.4
pkg troubleshooting
If pkg search returns no results:
$ pkg search sqlite3
force the update using pkg update -f. It will nuke and rebuild the package database:
root@bsd:/home/greg # pkg update -f
Updating FreeBSD repository catalogue...
Fetching meta.txz: 100%    944 B   0.9kB/s    00:01
Fetching packagesite.txz: 100%    6 MiB   3.4MB/s    00:02
Processing entries: 100%
FreeBSD repository update completed. 32488 packages processed.
Background
There are two issues when installing ports (packages and applications) on BSD:
1) The machine architecture, which is x86
2) The operating system, which is BSD
You certainly must have the correct architecture because it’s the bit pattern the machine knows how to get and make sense of things at a very low level.
Regarding the operating system, install either a BSD version application or an operating system BSD knows how to emulate. The only OS BSD knows how to emulate is Linux. For example, Netscape and Gnome can be run on BSD under Linux emulation.
Do not install any applications for Sparc Solaris. Applications for x86 Solaris might be supported under BSD emulation, but don’t bet the farm on it.
/stand/sysinstall and FTPing Packages from ftp.freebsd.org
Read this:
http://www.freebsddiary.org/portupgrade.php
Sometimes the FTP server is very busy. Friday afternoons are busy. Mornings are the best time to FTP because the nerds get out of bed around 12 noon.
To download/install packages:
-
Enter “/stand/sysinstall”
To exit the program and return to the console, enter Ctrl-C
-
Scroll to “Configure”, “Packages”, “FTP”, “Primary Site”
-
Enter “yes” to the question “Running multi-user, assume the … Messages appear such as “Logging into ftp.freebsd.org”
-
Hit the spacebar to select (x) packages to download.
When sucking down a package, the system will automatically and correctly install the package for you on the system. No manual installation intervention required!
Use the Linux version of Netscape. To find it, page down to “linux”. The program “linux-netscape-navigator-4.77” is the browser that does not support email. Use that one. Notice the package “linux_base-6.1” gets automatically selected when choose a Linux package. This package is the emulation junk for emulating Linux packages. You need it; we already installed it. It’s useful to have because it’s easier to find Linux programs than FreeBSD programs. It’s useful to run Linux programs. To use Netscape, need to be running an X application. Before install X, be sure to find out the exact LCD model type, recommended resolution, and video card for the system.
The letter X marks packages already installed on the local system.
Many packages are part of the default installation, such as FTP and SSH. To check, use the “which
" command. For example, enter "which ssh" at the command line. If the system finds the package, you'll get a system response such as "/usr/bin/ssh". In 4.1 or 4.1, FreeBSD started defaulting to OpenSSH. For SSH, you'll need to use the little L (l) parameter for my username. For the modem PPP configuration, see the PPP section in the Handbook. Need to modify some files in /etc/ppp, such as the phone number etc…
-
Use the right arrow key to move to “Install” and hit Return. If don’t want to install anything, press “Ctrl-C” and abort the installation.
The packages will be extracted and targets identified. The system will ask to confirm the packages and their dependencies.
… adding packages. The system will go get the packages and install them accordingly.
Sometimes a download will hang or get stuck or something… In this case, toggle to another shell by pressing Ctrl + Alt + F1 and log in as root. Find out what process is hanging by entering the “top” command. For example, you might see the Dialog process is consuming most of the CPU. Take note of the PID assigned to Dialog. Press “q” to quit out of top; then, enter “kill -1
" where is the process ID assigned to Dialog. Then, go back to the FTP Install screen (Ctrl + Alt + F1) and try FTPing the packages again. Sometimes the second time works. -
To exit the install, go up to X and arrow key to Exit Install.
-
Rehash and verify the new packages are present on the system:
greg-pc# rehash greg-pc# which netscape /usr/local/bin/netscape
Use “rehash”. If using cshell, it remembers certain things about how to find files. When something new gets installed, the cshell might not know where to find the new package. Rehash wakes up the cshell and updates it’s cache to find things. Rehash is the trick to tell the cshell to go out and learn how to find things again.
Note: After downloads to the system, enter “rehash” to update the path variable. Otherwise, my system will not discover the new package unless I reboot my system.
To verify that a package is present, enter:
wazoo> ls -l `which freeamp`
-r-xr-xr-x  1 root  wheel  686488 Apr 18  2001 /usr/local/bin/freeamp*
wazoo>
Old…. Installing and Removing Software Ports
A) Installing
Always try “pkg_add” first on a FreeBSD compiled port:
pkg_add sp-1.3.4.tgz
Then do a “pkg_info” to see if it installed.
Freebsd makes it extremely simple to try new software.
Do a ‘make install’, then a ‘make clean’ to install it.
do a ‘make deinstall’ to remove it.
GNU’s “make” documentation: http://www.gnu.org/software/make/make.html
B) Removing
It is recommended to remove packages as rarely as possible. Carelessly removing packages deletes dependencies, such as those used for libraries. Not good. It is possible to get backed into a corner if you’re not very careful.
Read “man pkg_info”.
‘pkg_delete’ blindly deletes packages. ‘make deinstall’ will use the Makefile to do a more elaborate and clean deinstall. Don’t delete questionable packages. They might be libraries.
FTP a New Version of XFree86
Two ways to go:
a) From ftp.freebsd.org
b) Download it from ftp.xfree86.org and install it via their “Xinstall.sh” script. It’s very easy to do. Sometimes the freebsd ftp server is problematic, which prevents packages from downloading. Sometimes the latest XFree86 code is not included on ftp.freebsd.org
Follow the easy-to-follow instructions “Installation Details for XFree86[tm] x.x.x”. For example, http://www.xfree86.org/4.4.0/Install.html
The following procedure describes approach a).
When installing XFree86, get ALL the files of everything (just to be safe) that have the same version number.
-
/stand/sysinstall
-
ftp.freebsd.org
…
-
Go to all the X directories. For example, the x11 directory
-
Get all the XFree86 4.0.3 stuff from everywhere.
(clients, documents, libraries, manuals)
-
Back up a level
-
Go into the “x11-servers” directory
-
Get the following:
XFree86-FontServer-4.0.3 XFree86-Server-4.0.3_1
-
Back up a level
-
Go into the “x11-fonts” directory
-
Get all the fonts that match my XFree86 release (4.0.3):
XFree86-FontServer-4.0.3 XFree86-font100dpi-4.0.3 XFree86-font75dpi-4.0.3 XFree86-fontDefaultBitmaps-4.0.3 XFree86-fontEncodingsr-4.0.3 XFree86-fontLatin2-4.0.3 XFree86-fontScalable-4.0.3
-
Hit OK and go back a level
-
Arrow key over and Install
….. things will take a while to FTP and install
-
Run through the XFree86 install program again ….
(see next section)
Configuring XFree86
Settings for old home-dell system:
 Mouse proto: Sysmouse (had problems with P/S2)
 Horrizontal sync: 7 high freq, Super VGA 1024x768 @ 70hz
 Vertical sync: 3 50-100
 Video driver: 164 Diamond Permedia2
 Video memory: 6, 8192K (8MB)
If you have a new system, upgrade to the latest XFree86 on ftp.freebsd.org. Otherwise, you might have some unsupported chip sets and graphic controllers.
The X86 config file is in /etc/XF86Config.
Be sure you’re running a 4.0.x version of XFree86 because it supports new graphics controllers for laptops. To support a new controller, you may need to go to XFree86.org and FTP the entire source tree; then do a make…
Tips: o To abort the configuration, enter Ctrl-C. It appears that once in the configuration script, you can’t back up. You must start over.
  o I can always go back and change these configuration settings
    if I don't like them.

  o To kill a Windows Manager, such as Gnome Enlightenment,
    simultaneously enter "Ctrl Alt Backspace".
http://www.FreeBSD.org/cgi/getmsg.cgi?fetch=495447+501561+/usr/local/www/db/text/2000/freebsd-questions/20001022.freebsd-questions
-
Enter “/stand/sysinstall” to go the configuration program.
-
Go to “Configure” then “XFree86”. Configure the XFree86 server.
-
There are different ways to go. The old stable way is to download “xf86config”. It’s been around for years. However, the new program is “XF86Setup”. It’s the fully graphical XFree86 configuration tool. If you want to use the new one, go read the manual. Otherwise, use the old one.
Select “xf86config”. Shell-script based XFree86 config tool.
-
Enter “yes” to configure the mouse daemon. Go down to enable to test and run the mouse. Remember “/dev/sysmouse”. It’s an answer to a config question that you get asked later on.
Try moving the mouse. Is it moving? If no, page down to “type” and select a mouse protocol. Specify the type of port the mouse is using. Go back to “enable” and try testing the mouse movement again. Move the mouse. Is it moving? If no, repeat until the mouse it works. Try configuring one protocol/port at a time until the mouse works. Try them in an orderly fashion.
For the laptop, the mouse worked with the “PS-2” port.
If can’t get the mouse to work, bail out of the program and look at the /var/log/messages file to see what’s going on. Check if booting even believes you have a serial port, com port, or usb port.
Enter “vi /var/log/messages”. After the file opens, go to the end of it by entering a capital G. It’s better to go to the latest events then scroll backward. Go to the moment that you last booted the machine. Scroll back until you see the copyrights for the Univ of Calif. That’s the beginning. That’s the beginning of the boot sequence. In the case of a mouse problem, look for anything that talks about a serial port. After inspecting the log report for the laptop, we found we had a USB port! If the XFree86 configuration tool knows nothing about USB ports, you might be out of luck. Might need to use a standard serial mouse.
If installed Emacs correctly, you can use it without using X.
Tip: After unplugging a device from the machine, you need to reboot because the device got detected during the probe.
To see if BIOS is configured to auto-detect an external mouse, break into the BIOS (press F2 during reboot) and check. In BIOS, the mouse section is identified by “Pointing Device”. If the field setting says “Touch Pad-PS/2 Mouse”, that’s good. So, quit out of the BIOS and boot BSD again.
-
Choose “Mouse Systems Three Button Protocol” type. That is, enter protocols number 2.
-
Enter “no” to the question about clear DTD and RTS.
Do you want to emulate three buttons on the mouse? Answer “no” since the middle scroll wheel on the mouse is also a middle mouse button.
-
Enter “/dev/sysmouse”. The program told us this earlier.
Keyboard type. Usually answer “Generic 101 Key PC”, which is choice #1. However, there is also a Dell keyboard now which is 5. We chose that.
Enter a number to choose the country. Choose US English. Enter 1.
A variant name for US. Just press enter…
-
Enter “no” to the question “Do you want to select additional XKB options?” Not sure about what this means, so just say no.
-
Enter “yes” to “Do you want to enable the bindings for the Alt keys”
-
Enter “yes” for “Non ASCI characters”
Screen and video settings:
… now we want to set the specs for the monitor. Press Enter.
-
Horizontal sync range.
A. Specify other, enter 11
B. Enter “30-95”
(This is the horizontal scan rate for the monitor)
-
Vertical sync range
A. Specify other, enter 5
B. Enter “50-120”
(This is the vertical scan rate for the monitor)
-
Identifier for the monitor definition. You can say anything you want here. Enter “foobar, foobar, foobar”. Enter “mymonitor”
Depending on the version of XFree86, might not need to enter “foobar” three times. On version 4.0.3, only had to enter it once.
-
Do you want to look at the card database? yes
Enter the number corresponding with the card definition.
… keep scrolling until you get to the ATI Rage Mobility stuff for the laptop. All the ATI items map to the same drivers, so don’t panic if you don’t see you specific model.
From the laptop, we choose 36.
If see the “r128” driver after hitting Enter, that’s good. R128 is the correct driver.
-
Server to run for the man page documentation: 5
-
Which of these screen types do you intend to run by default? 5
-
Do you want my to set the symbolic link? Enter “yes”. Otherwise, it won’t work.
-
How much video memory do you have? Laptop has 16 MB, so enter “6” for “other”. Actually need to enter “16384” KB, which is 2 x 8192.
-
Identifier for the video car definition. You can say anything you want here. Enter “foobar, foobar, foobar” or “myvideocard”.
19b. …. Modes that cannot be support due to monitor. Enter 4. “The modes are ok to continue.
19c. Enter a number to choose the default depth for display. It’s asking how many bits do you want per color? Although Dell told says 32 bits, that’s really 24 bits. (32 bits is not a choice).
 Depth is the number of bits per pixel. The 32 bit color is really
 encoded with 24 bits. That gives you 8 bits of control over each
 of the 3 colors that are used: red, green, blue (rgb).
-
Enter a number to choose the corresponding RAMDAQ. Enter “q” to not do this. Quit without the selection of RAMDAQ.
-
Clock chip. Press “Enter” to say you don’t want a clock chip setting. Similar to the RAMDAQ, say no. Don’t want to probe the clock.
-
Do you want to run X? Enter “no”.
-
Tell it these resolution modes are ok. Editing your modes this way is very hard to do. Enter “5”
-
Write it to /etc/Xconfig? Hit “y”.
… back to the blue screen.
Specify the window manager, such as gnome. Can use the old fashion one called TWM. However, if you miss gnome, can always go back to /stand/sysinstall and get it later.
Many folks use Gnome and Enlightenment.
-
Exit. Tab over and Exit Install.
-
Enter “startx” to start X
When you enter startx, it reads the .Xdefaults and .xinitrc files. However, startx is not monitoring these files for real time changes. In the twm menu, the Restart option might restart startx.
On first try, we got the error message “Fatal server error: no screens found”.
To inspect the problem:
vi /var/log/XFree86.0.0.log
Enter “Ctrl U” to back out of a problem.
The config file is “x86config”, which contains a screens section. To see the file, look in /etc/X11.
Use “which” to locate a program file (in this case, X) in a user’s path. Then, change the permissions on it:
greg-pc# ls -l
which Xlrwxrwxrwx 1 root wheel 7 Sep 7 16:19 /usr/X11R6/bin/X -> XFree86 greg-pc# ls -lwhich /usr/X11R6/bin/XFree86-rwxr-xr-x 1 root wheel 1759812 Apr 18 2001 /usr/X11R6/bin/XFree86 greg-pc# chmod 4711 /usr/X11R6/bin/XFree86To enable a user account to startx (not as root):
chmod 4711 /usr/X11R6/bin/X
Tab Window Manager
Read “man twm”
You can change the colors on the TWM window bars.
.xinitrc
It’s the X Windows System Initializer
Controls the actual tasks you’re going to do within X. To learn more, enter “man xinit”
The .xinitrc file controls the X initialization startup configuration.
For example:
```
cat ~jerry/.xinitrc
#!/bin/csh -f

xrdb -load $HOME/.Xdefaults
xset bc s 600 s blank
xset -b b off
#xset -b 0 0 0
xmodmap $HOME/.xmodmaprc
xhost +suncs-sw-0

rxvt -C -title Console -geometry 80x6+0+0 -rv -cr red -pr red -ut &
#xterm -fn 7x13bold -r -cr red -ms red -vb -sl 500 -geometry 80x54+700+100 &
xterm -r -vb -sl 500 -geometry 80x50+0+150 &
emacs -geometry 80x57+635+80 &
# emacs --unibyte -geometry 80x54+0+100 -ms red &
# emacs -fn 7x13bold -geometry 80x76+570+0 -ms red &
# xload -geometry 120x141+1157+855 &
# gnomecal &
twm
#sawmill
```
Tip 1: To kill a Windows Manager, such as Gnome Enlightenment, simultaneously enter “Ctrl Alt Backspace”.
Tip 2: After launching an application, such as Emacs, enter “xwininfo” to get geometric dimensions for one of my terminal windows. This is handy for setting the “emacs -geometry” line in my .xinitrc file to specify the coordinates for Emacs when it starts up.
Tip3. The sequence “Ctrl Alt -“ will cycle through my resolution settings. The “-“ is the purple minus numeric key on my Dell keyboard. It’s the “P” key.
.Xdefaults
A set of central properties for the things you will be doing within X. This is the most central place to customize X settings. The X client resources will come out of the .Xdefaults file that was found in the home directory of the path of the user who invoked the client. When the X client starts up, it can’t see what’s in the display by default. The X client will look for resources in the path of the user who invoked the client or in the system defaults of the machine where the client was invoked.
For example:
cat ~jerry/.Xdefaults

XTerm.VT100.geometry:			80x40
/* xterm*font:			-*-fixed-bold-*-normal-*-*-100-*-*-*-*-*-* */
xterm*font:				7x14
xterm*cursorColor:			red
xterm*pointerColor:			red
xterm*pointerShape:			arrow
XTerm.VT100.Background:			Black
XTerm.VT100.Foreground:			White
XTerm.VT100.JumpScroll:			True
XTerm.VT100.MultiScroll:		True
XTerm.VT100.ReverseWrap:		True
XTerm.VT100.saveLines:			256
XTerm*scrollBar:			True
XTerm*scrollInput:			True
XTerm*scrollKey:			True
XTerm*titeInhibit:			on
XTerm*TtyModes:				erase ^? kill ^U intr ^C

Emacs.BitmapIcon:	on
/* Emacs*Font:		-*-fixed-bold-*-normal-*-*-100-*-*-*-*-*-* */
/* Emacs.selectionFont:	-*-fixed-bold-*-normal-*-*-100-*-*-*-*-*-* */
/* Emacs*Font:		-*-lucidatypewriter-medium-r-normal-*-*-100-100-100-*-*-*-* */
/* Emacs.selectionFont:	-*-lucidatypewriter-medium-r-normal-*-*-100-100-100-*-*-*-* */
Emacs*Font:		-sony-fixed-medium-r-normal--16-120-100-100-c-80-*-1
Emacs.selectionFont:	-sony-fixed-medium-r-normal--16-120-100-100-c-80-*-1
Emacs.background:	BlanchedAlmond
Emacs.foreground:	black
Emacs.cursorColor:	red
Emacs.pointerColor:	red
Emacs.pane.menubar*background: black
Emacs.pane.menubar*foreground: white
Editing the XF86Config file in /etc/X11
Caution: Be very conservative when trying out something in this file. When in doubt while editing, make a backup of the original XF86Config file. Be very cautious! If a change turns out to be wrong, it will be very difficult to revert back to the original working version.
Inside the XF86Config file, if the file says it deleted an item; then, the file is not using the item.
Can change the size of the type face that the system defaults to.
Poke around on freebsd.org to find sample XF86Config files.
Sometimes there are problems using external mice. Use the touchpad when in trouble.
- See what’s in /etc. Notice the date on /etc/XF86Config. That’s the old copy of X we installed previously. It’s garbage.
greg-pc# ls /etc
X11             gnats           motd            rc              remote
XF86Config      group           mtree           rc.atm          resolv.conf
aliases         host.conf       namedb          rc.conf         rmt
amd.map         hosts           netstart        rc.devfs        rpc
apmd.conf       hosts.allow     networks        rc.diskless1    security
auth.conf       hosts.equiv     newsyslog.conf  rc.diskless2    services
crontab         hosts.lpd       objformat       rc.firewall     shells
csh.cshrc       inetd.conf      pam.conf        rc.firewall6    shells.bak
csh.login       isdn            passwd          rc.i386         skel
csh.logout      kerberosIV      pccard_ether    rc.isdn         skeykeys
defaults        localtime       periodic        rc.network      spwd.db
dhclient.conf   locate.rc       phones          rc.network6     ssh
disktab         login.access    pim6dd.conf     rc.pccard       ssl
dm.conf         login.conf      pim6sd.conf     rc.resume       syslog.conf
dumpdates       mail            ppp             rc.serial       termcap
fbtab           mail.rc         printcap        rc.shutdown     ttys
fstab           manpath.config  profile         rc.suspend      usbd.conf
ftpusers        master.passwd   protocols       rc.syscons      uucp
gettytab        modems          pwd.db          rc.sysctl       wall_cmos_clock
greg-pc# ls -l /etc/XF86Config
-rw-r--r--  1 root  wheel  19917 Sep  6 18:37 /etc/XF86Config
- The version we want is in /etc/X11:
$ls /etc/X11
XF86Config      fs              rstart          xinit           xsm
XF86Config~     lbxproxy        twm             xkb
app-defaults    proxymngr       xdm             xserver
- Open the file “XF86Config”:
vi /etc/X11/XF86Config
-
Go to the end of the file (Shift G) and find the section “Screen sections”.
-
This is the order X will try these pixel resolutions in, going left to right. Because the Dell laptop supports 1400 x 1050, you want to reverse the order of the resolutions. When X comes up, it will be in the highest resolution by default. Be careful not to make a syntax mistake. If you do, X will not be happy.
We put “1400x1050” on the line marked <== .
```
# **********************************************************************
# Screen sections
# **********************************************************************

# Any number of screen sections may be present.  Each describes
# the configuration of a single screen.  A single specific screen section
# may be specified from the X server command line with the "-screen"
# option.
Section "Screen"
    Identifier  "Screen 1"
    Device      "myvideocard"
    Monitor     "mymonitor"
    DefaultDepth 24

    Subsection "Display"
        Depth       8
        Modes       "640x480" "800x600" "1024x768" "1280x1024"
        ViewPort    0 0
    EndSubsection
    Subsection "Display"
        Depth       16
        Modes       "640x480" "800x600" "1024x768" "1280x1024"
        ViewPort    0 0
    EndSubsection
    Subsection "Display"
        Depth       24
        Modes       "1400x1050" "1280x1024" "1024x768" "800x600" "640x480" <==
        ViewPort    0 0
    EndSubsection
EndSection
```
- To set resolution to 1400x1050, we also had to insert the following line in the “Monitor” section:
Section “Monitor”:
ModeLine "1400x1050" 107.86 1400 1440 1552 1688 1050 1050 1053 1066 +hsync +vsync
- Save the file
/var/log/XF86Config.log
This is the startup log file.
The default XF86Config file is loaded with all kinds of stuff. X then probes the hardware and finds out what which items are really usable for the system. The XF86Config.log report will tell identify which settings are not support on my hardware.
There is a code key at the top of the file that looks like this:
Markers: (--) probed, (**) from config file, (==) default setting,
         (++) from command line, (!!) notice, (II) informational,
         (WW) warning, (EE) error, (??) unknown.
FreeBSD Device Discovery Log
… all the stuff that BSD found when it last booted. For example, use “dmesg | more” to see what sound card chip set you have. The output of this command is a little more readable than /var/log/messages
$ dmesg | more
Copyright (c) 1992-2001 The FreeBSD Project.
Copyright (c) 1979, 1980, 1983, 1986, 1988, 1989, 1991, 1992, 1993, 1994
        The Regents of the University of California. All rights reserved.
FreeBSD 4.3-RELEASE #0: Sat Apr 21 10:54:49 GMT 2001
    jkh@narf.osd.bsdi.com:/usr/src/sys/compile/GENERIC
Timecounter "i8254"  frequency 1193182 Hz
CPU: Pentium III/Pentium III Xeon/Celeron (847.18-MHz 686-class CPU)
  Origin = "GenuineIntel"  Id = 0x686  Stepping = 6
  Features=0x383f9ff<FPU,VME,DE,PSE,TSC,MSR,PAE,MCE,CX8,SEP,MTRR,PGE,MCA,CMOV,PAT,PSE36,MMX,FXSR,SSE>
real memory  = 268353536 (262064K bytes)
config> di sio1
config> di bt0
config> di aic0
config> di aha0
config> di adv0
config> q
avail memory = 256901120 (250880K bytes)
Preloaded elf kernel "kernel" at 0xc044d000.
Preloaded userconfig_script "/boot/kernel.conf" at 0xc044d09c.
Pentium Pro MTRR support enabled
md0: Malloc disk
npx0: <math processor> on motherboard
npx0: INT 16 interface
pcib0: <Host to PCI bridge> on motherboard
pci0: <PCI bus> on pcib0
pcib1: <PCI to PCI bridge (vendor=8086 device=1131)> at device 1.0 on pci0
pci1: <PCI bus> on pcib1
pci1: <ATI model 4d46 graphics accelerator> at 0.0 irq 11
pcib2: <PCI to PCI bridge (vendor=8086 device=2448)> at device 30.0 on pci0
pci2: <PCI bus> on pcib2
pci2: <unknown card> (vendor=0x125d, dev=0x1998) at 3.0 irq 5
pcib3: <PCI to PCI bridge (vendor=1668 device=0100)> at device 6.0 on pci2
pci8: <PCI bus> on pcib3
fxp0: <Intel Pro 10/100B/100+ Ethernet> port 0xecc0-0xecff mem 0xf8e00000-0xf8efffff,0xf8fff000-0xf8ffffff irq 11 at device 4.0 on pci8
fxp0: Ethernet address 00:20:e0:67:1e:76
pci8: <unknown card> (vendor=0x11c1, dev=0x0448) at 8.0 irq 11
chip1: <PCI to CardBus bridge (vendor=104c device=ac42)> irq 11 at device 15.0 on pci2
chip2: <PCI to CardBus bridge (vendor=104c device=ac42)> irq 11 at device 15.1 on pci2
pci2: <unknown card> (vendor=0x104c, dev=0x8027) at 15.2 irq 11
isab0: <PCI to ISA bridge (vendor=8086 device=244c)> at device 31.0 on pci0
isa0: <ISA bus> on isab0
atapci0: <Intel ICH2 ATA100 controller> port 0xbfa0-0xbfaf at device 31.1 on pci0
ata0: at 0x1f0 irq 14 on atapci0
uhci0: <UHCI (generic) USB controller> port 0xbce0-0xbcff irq 11 at device 31.2 on pci0
uhci0: (New UHCI DeviceId=0x24428086)
usb0: <UHCI (generic) USB controller> on uhci0
usb0: USB revision 1.0
uhub0: (0x24428086) UHCI root hub, class 9/0, rev 1.00/1.00, addr 1
uhub0: 2 ports with 2 removable, self powered
ums0: Logitech BD58 mouse, rev 1.10/6.20, addr 2, iclass 3/1
device_probe_and_attach: ums0 attach returned 6
ugen0: Logitech, Inc. BD58 mouse, rev 1.10/6.20, addr 2
ugen0: setting configuration index 0 failed
device_probe_and_attach: ugen0 attach returned 6
fdc0: <NEC 72065B or clone> at port 0x3f0-0x3f5,0x3f7 irq 6 drq 2 on isa0
fdc0: FIFO enabled, 8 bytes threshold
fd0: <1440-KB 3.5" drive> on fdc0 drive 0
atkbdc0: <Keyboard controller (i8042)> at port 0x60,0x64 on isa0
atkbd0: <AT Keyboard> flags 0x1 irq 1 on atkbdc0
kbd0 at atkbd0
psm0: <PS/2 Mouse> irq 12 on atkbdc0
psm0: model Generic PS/2 mouse, device ID 0
vga0: <Generic ISA VGA> at port 0x3c0-0x3df iomem 0xa0000-0xbffff on isa0
sc0: <System console> at flags 0x100 on isa0
sc0: VGA <16 virtual consoles, flags=0x300>
pcic0: <VLSI 82C146> at port 0x3e0 iomem 0xd0000 on isa0
pcic0: Polling mode
pccard0: <PC Card bus -- kludge version> on pcic0
pccard1: <PC Card bus -- kludge version> on pcic0
sio0 at port 0x3f8-0x3ff irq 4 flags 0x10 on isa0
sio0: type 16550A
ppc0: <Parallel port> at port 0x378-0x37f irq 7 on isa0
ppc0: SMC-like chipset (ECP/EPP/PS2/NIBBLE) in COMPATIBLE mode
ppc0: FIFO with 16/16/8 bytes threshold
plip0: <PLIP network interface> on ppbus0
lpt0: <Printer> on ppbus0
lpt0: Interrupt-driven port
ppi0: <Parallel I/O> on ppbus0
ad0: 19077MB <IBM-DJSA-220> [38760/16/63] at ata0-master UDMA66
acd0: DVD-ROM <TOSHIBA DVD-ROM SD-C2502> at ata0-slave using PIO4
Mounting root from ufs:/dev/ad0s2a
ums0: Logitech USB Mouse, rev 1.10/6.20, addr 2, iclass 3/1
ums0: 3 buttons and Z dir.
microuptime() went backwards (49.075199 -> 49.-695330400)
TCP Listening
The file “startx” controls how X starts up. Starting with 4.5 BSD, X no longer listens to tcp by default. You must SSH into remote hosts before the Xserver will accept displays from Xclients (such as suncs9). On the laptop, we had to modify startx like this:
#listen_tcp="-nolisten tcp"
listen_tcp=""
For details, see /usr/X11R6/bin/startx
SSH + X into a Company from Home BSD
Note: If SSH isn’t working, a DNS resolution problem might be causing it. Ssee “34. DNS resolution”
To SSH and use X, do this:
ssh -X gmcmillan@ssh.procket.com
Add the following lines to /etc/ssh/ssh_config:
ForwardX11 yes
Protocol 2,1
You shouldn’t need to run xhost. Only make sure you run ssh with the “-X” option or check that the line “ForwardX11 yes” is present in your /etc/ssh/ssh_config. You’ll probably also want the line “Protocol 2,1” in the same config file to ensure that you are using v2 of the ssh protocol.
Its most likely that neither of these are set by default, the /etc/ssh/ssh_config installed by FreeBSD 4.4 on the home system was completely blank.
If you do not want to edit the global config file, you could also add these options to ~/.ssh/config.
Caveat. If you have “ForwardX11 yes” in the config file, you don’t need the “-X” on the command line, but having both won’t hurt anything.
As for the frame maker error: maker (uninit): Error: Can’t open display…
This is caused because your DISPLAY environment variable is not set properly. Once logged in, you should always use ssh instead of rsh to hop between machines. SSH sets up a special X display that will grab all the X traffic and send it over the encrypted tunnel back to your machine. If you use rsh (or r9 in this case), that X display will not get set properly, and it will not work.
X is a very chatty protocol which makes running simple applications over a network (let alone something complex like Framemaker) almost impossible.
SSH Addition to .twmrc
You can list items in the TDM pulldown menu.
Modify .twmrc to set up an automatic X + SSH login option for when you need to access work from home.
Add the following line to .twmrc:
#
# alt-s over root window fires up ssh to work.
#
Function "ssh2work"     { f.exec "xhost +ssh.procket.com; xterm -e ssh -X -C -l gmcmillan ssh.procket.com &" }
"s"     =   m   : root  : f.function "ssh2work"


"xhost + ssh.procket.com xterm -e ssh -X -C -l gmcmillan ssh.procket.com &"
In front of the line, add “ssh to work”
The “xhost” command gives the “ssh.procket.com” host the ability to write to my local display. Instead of the xterm executing a shell, it executes ssh with a -X and a -C (compression) followed by my ID and host. The entire statement needs to be in quotes (a quoted string).
Remote Applications
It’s better to rlogin to a recognized host on the network and run my applications (i.e., emacs, netscape) from that machine instead of running them from my unrecognized host (bsd2-laptop).
Hosts on the network mount (discover) the file systems you want to work with. Trying to figure out how to configure auto-mount on bsd2-laptop to run on the company’s network is a big hassle. It’s a potential disaster. It’s much easier to rsh clients on hosts that know about these file systems.
Example. If you try to cd /procket from greg-pc, the host would be confused because it is not automounting /procket’s file systems. There are ways to getting this to work, but they are all a nightmare to configure. If Procket is the only place that you use the greg-pc, then maybe you would want to configure automount to mount Procket’s file system. However, if you use greg-pc at home where those file systems will not be found, then dont’ do it.
Manually Add an Xhost
$ xhost + suncs9
suncs9 being added to access control list
greg-pc# rlogin -l gmcmillan suncs9
Password:
Last login: Mon Sep 24 10:54:46 from dhcp5132.procket
OS Release is Solaris 7 8/99 s998s_u3wos_11 SPARC
System is a Sun Ultra 60 UPA/PCI (2 X UltraSPARC-II 450MHz) 2.0 GB RAM
Sun Microsystems Inc.   SunOS 5.7       Generic October 1998
Tip: Can set a local password file on my laptop. It will not be exported to anyone else.
Window Geometry and Placement
A handy tool for placing windows on the screen:
-
Enter “xwininfo”
-
Click on a window with the mouse pointer
-
The window information is displayed in the shell
-
Place the geometry values in the appropriate file:
For Emacs, put this in ~/.Xdefaults:
Emacs.geometry: 104x33+227+50
For the initial xterm that “startx” creates, put this in ~/.xinitrc:
xterm -r -vb -sl 500 -geometry 118x26+227-11 &
For the second xterm created by twm pulldown, put this in ~/.Xdefaults:
XTerm.VT100.geometry: 85x20+156-19
The next time you start the window manager, the clients will use the specified window geometry.
Sound Support via a New Kernel
Note: For robust kernel config info, see “41. Custom Kernel”
- Make a copy of the working GENERIC kernel config file:
cd /usr/src/sys/i386/conf
cp GENERIC greg-kernel-1

root> pwd
/usr/src/sys/i386/conf
root> ls
GENERIC         LINT            greg-kernel-1   greg-kernel-1~
root>
Note: You must be root (#) to perform these operations.
Note: When reconfiguring a kernel, it is always a good idea to keep a kernel that is known to work on hand.
-
Add the sound support for the souncdcard.
Edit two files:
a) Put this line in /boot/loader.conf:
snd_maestro3_load="YES"b) The kernel config file (greg-kernel-1) will need:
device		pcm
pseudo-device	speaker
Tip: Don’t forget to put a hard return after the “r” in “speaker”. The kernel is very fussy about there being a line at the end of the config file. It’s very particular about syntax.
-
Run config(8) to generate the kernel source code.
/usr/sbin/config greg-kernel-1
If I get this error:
config: line 195: syntax error
Then, open the kernel in emacs and find the problem. To go directly to the line in emacs, enter “ESC 195 ESC x goto-line” then hit return. Emacs takes you to line 195. To go to the end of the file, enter “ESC” “shift >” For the top, “ESC” “shift <”
For docs, see file:/usr/share/doc/handbook/kernelconfig-building.html
-
Change to the build directory:
cd /usr/src/sys/compile/greg-kernel-1
-
Compile the kernel:
make depend make
-
Install the new kernel:
make install
-
Reboot the system
After reboot, you can delete all the leftover generated file in /usr/src/sys/compile/greg-kernel-1
-
Test the sound card by entering “spkrtest”.
Select a jingle from the sound list. Do you hear music? If yes, then the card works!
Troubleshooting, if the kernel does not boot:
Choose the kernel you want to boot from at the FreeBSD boot
loader. You can access this when the system counts down from
10. Hit any key except for the enter key, type "unload" and then
type "boot kernel.old", or the filename of any other kernel that
will boot properly. When reconfiguring a kernel, it is always a
good idea to keep a kernel that is known to work on hand.
After booting with a good kernel you can check over your
configuration file and try to build it again. One helpful
resource is the /var/log/messages file which records, among other
things, all of the kernel messages from every successful
boot. Also, the dmesg(8) command will print the kernel messages
from the current boot.
If things still aren’t booting, boot the file “kernel.GENERIC”.
The backup files are stored here:
root> ls -l /kern*
-r-xr-xr-x  1 root  wheel  3232684 Dec 31 15:45 /kernel
-r-xr-xr-x  1 root  wheel  3352178 Apr 21  2001 /kernel.GENERIC
-r-xr-xr-x  1 root  wheel  3352178 Apr 21  2001 /kernel.old
Installing a New Version of BSD
Use uname to display what’s running:
$ uname -a
FreeBSD bsd 10.2-RELEASE FreeBSD 10.2-RELEASE #0: Thu Feb 25 15:49:12 PST 2016     greg@bsd:/usr/obj/usr/src/sys/GREGKERNEL  i386
Doing a fresh re-installation from an iso image on a bootable CD is the safest and easiest way to go.
Do this:
-
Back up all data
Take inventory of the installed packages. Run the pkg_info command and redirect the output to a file that you’re going to save.
pkg_info >> <filename>Back everything up into your home directory. Make tar files of all the home directories for users that you’ve installed. The name “tar” is an old fashion name that meant Tape ARchive back in the days where files were saved on tapes.
tar zcf <destination-filename> <source-directory-to-get-files-from>Meaning of the flags in the “tar” command:
z = Use gzip c = Create a tar file f = The next parameter is the name of the tar fileTypically, make the filename that you want to save end with ".tgz". This means it's a tar file that has been gzipped (compressed). To untar a file, use ``tar zxf <filename>``If you’ve done any customization of /etc, save that stuff too, such as any sendmail, rc.conf, fstab, .Xdefaults, .emacs, .xinitrc, /etc/XF86Config, .vm, .login, .motd.
Save any packages that are hard to find/get on the Internet, such as RealPlayer. Be a Pack Rat!!!!
-
Use the USB-to-PS2 adaptor to connect the Kensington keyboard to the Dell desktop. A direct USB cable connection cannot access the initial BIOS boot setup.
-
Ensure the correct HDD and CD-ROM hardware connections are set:
-
The Maxtor HDD and Yamaha CD-RW must be connected to the same IDE ribbon cable. Put Maxtor in the first position from the motherboard.
-
The jumper pin setting on the Maxtor HDD must be set to master; Yamaha must be set to slave. When FBSD boots, the “dmesg” output displays this:
ad0: 239372MB <Maxtor 6Y250P0> [486344/16/63] at ata0-master UDMA33 acd0: CD-RW <YAMAHA CRW8824E> at ata0-slave PIO4- During normal operations, the Yamaha is not connected to the IDE ribbon. When the Yamaha is connected, FreeBSD does not boot into multi-user mode and the system hangs on boot and displays these errors.
run_interrupt_driven_hooks: still waiting after 180 seconds for xpt_config (aprobe0:ata0:0:1:0): INQUIRY. CDB (aprobe0:ata0:0:1:0):CAM status: Command timeout (aprobe0:ata0:0:1:0):Retry command (aprobe0:ata0:0:1:0):Error 5, Retries exhausted -
-
Set BIOS settings. Press the DEL key to access the BIOS on the Dell:
-
Main screen settings:
Primary IDE Master [Maxtor 6Y250P0] Secondary IDE Master [YAMAHA CRW8824E]
-
Boot screen settings:
First Boot Device [ATAPI CD-ROM Drive] Second Boot Device [Hard Drive]
-
-
Download the disc1 CD formatted iso image (e.g., FreeBSD-10.2-RELEASE-i386-disc1.iso) from https://www.freebsd.org/where.html#download. This image contains the ports collection.
In the old Dell desktop, old CD-ROM drives are installed. They DO NOT read DVD formatted media discs.
Run a SHA 256 checksum on the downloaded file:
 $ shasum -a 256 FreeBSD-10.2-RELEASE-i386-disc1.iso
 0e7094ae9f4f79d8955f193a1f2f5ab4f8b300e57eccd3b9bd959951ee079020
The hash output must match eactly what’s published in the file at ftp://ftp.freebsd.org/pub/FreeBSD/releases/i386/i386/ISO-IMAGES/10.2/CHECKSUM.SHA256-FreeBSD-10.2-RELEASE-i386. If the sequence does not match, the file is corrupted and must be downloaded again.
-
Make a bootable CD for the disc1 formatted iso image.
Use a plain CD-R writable disc. DO NOT use a DVD disc because the Dell’s old CD drives cannot read a DVD format.
Follow https://www.youtube.com/watch?v=XegXd6mPs-c
a. Open Disk Utility on mac
b. File > Open Disk Image > choose FreeBSD-10.2-RELEASE-i386-disc1.iso
c. Notice the contents of the iso display, a hard drive looking icon displays next to the iso in the left panel inside Disk Utility, and the iso image is mounted on the mac’s desktop.
d. In Disk Utility, select the top .iso image then click the Burn icon. The contents of the iso will be burned as a bootable image onto the CD disc.
Note: There’s no need to convert a .iso to a .cdr. Simply burn the FreeBSD source iso itself.
-
Boot the disc
-
When the disc boots, the FreeBSD splash screen displays. Press spacebar to pause the boot process.
-
Go into Configure Boot Options. Turn on Safe Mode and Single User mode.
-
Press Backspace to return to the main menu and continue boot process by pressing Enter. During the boot up, ensure the Maxtor and Yamaha both scroll by in the log display.
Press Enter when prompted by this:
Enter full pathname of shell or RETURN for /bin/sh:The boot continues. Type “exit” at the prompt, which continues the boot process:
# exit/boot/loader … is read from the CD, the local file systems are mounted, and the install continues.
Follow https://www.freebsd.org/doc/en_US.ISO8859-1/books/handbook/bsdinstall-start.html
-
-
Follow the FreeBSD Installer wizard
- Welcome > Install
- Keymap Selection > Continue with default keymap
- Set Hostname > bsd
- Distribution Select > Select doc, games, ports, src
- Partition Scheme > MBR DOS Partitions > Manual
Tips:
- Use MBR because of old hardware
- Press Tab to get to the edit box for creating/editing partitions
- Create the /usr partition last
Partition Editor:
How much space want to use on the disk:
 ada0		234	GB	MBR
 ada0s1		234	GB	BSD
Within BSD, set what slices of storage space are used, their file systems types, and their mount points:
 ada0s1a		5	GB	freebsd-ufs	/
 ada0s1b		512	MB	freebsd-swap	none
 ada0s1d		5	GB	freebsd-ufs	/scratch
 ada0s1e		223	GB	freebsd-ufs	/usr
If you’re using the same partitions you had before, just Quit (Q) and finish. No changes to the MB size or space of the slices.
See https://www.youtube.com/watch?v=OwqCjz9Fgao
See http://daemon-notes.com/articles/system/part-fs/intro
-
Remove the Yamaha CD-RW drive from the IDE ribbon (leaving only the Maxtor HDD connected)
When the Yamaha CD-RW is connected, FreeBSD does not boot into multi-user mode and the system hangs on boot and displays these errors.
run_interrupt_driven_hooks: still waiting after 180 seconds for xpt_config
(aprobe0:ata0:0:1:0): INQUIRY. CDB
(aprobe0:ata0:0:1:0):CAM status: Command timeout
(aprobe0:ata0:0:1:0):Retry command
(aprobe0:ata0:0:1:0):Error 5, Retries exhausted
When Yamaha CD-RW is connected, only Single User mode can be accessed (with the Safe Mode option enabled)
-
ACPI caused problems with old hardware. Disable it when the kernel boots up:
vi /boot/loader.confthen add this line:
hint.acpi.0.disabled="1"
Slice Methodology
You must create the following mandatory slices:
/	   Root does not need to be very big. Only reason to make it
	   big is to make /temp big if I'm doing something that
	   needs alot of temp files. Many people cope with this
	   by making /temp a simlink to /user/temp because the
	   /user partition is usually alot bigger. A fairly
	   small number of things is done in root. For example,
	   /etc, /sbin, and /boot.

	   Allocated 400MB to this root slice


swap	   Should be at least twice as big as the amount of physical RAM memory in my entire system

	   256 X 2 = 512 MB

	   Allocated 500MB to this swap slice


/usr	   Almost all my applications are in /user/local. Normal stuff is in /user/sbin

           Allocated 5.5 G for this slice

/scratch   (optional). Allocated 1G for this slice
Note: /local is always a local harddrive on whatever machine you are logged into.
Beyond these, you can create more if desired. You might create a scratch partition too for new release testing. A scratch partition allows you to leave everything else alone while we’re screwing with the new release. FreeBSD typically needs around 300M to run bare bones, so keep this in mind when creating the size of the scratch partition. Assigning 2 Gig to the scratch partition is very ample.
Until you know your pattern of use, it’s difficult to know what other partitions to create. A partition maps to a specific purpose or user pattern. For example, suppose you want to build a bridge. You don’t know the size and shape of the bridge until you monitor the number of people that swim across the river.
Note: If you don’t create a /home partition for home directories, they will be put in the /user partition. Some people have strong opinions about doing/not doing this.
Back in the dark ages, folks gauged partition sizes according to the capacity size of the backup devices.
Don’t be stingy on the partition sizes. It’s such a nuisance to change the partition size after you’ve already allocated space to it.
Package Won’t Kick Off
then create an alias to the program
When a program isn’t in your path, you need to qualify the reference to it with enough of a path specification so that it will be found. Or you could make an alias for it:
alias realplay /usr/local/RealPlayer8/realplay
Readability Check
To verify if a directory can be read by others:
root> ls -ld /dos
drwxr-xr-x  1 root  wheel  8192 Jan  1  1980 /dos
root> ls /dos
ADOBEAPP                Dumplog.txt             _RESTORE
ATI                     LOGO.SYS                autoexec.nav
AUTOEXEC.BAK            MSDOS.---               command.PIF
NFS Mounted File Systems
rlogin suncs9
/home/gmcmillan
The /home is not local to suncs9. The /home is NFS mounted. However, according to Procket, /home is my home on whatever host I’m running programs on.
Mounting CDROM File System
umount /dev/acd0c
From fstab, you probably do not want to remove noauto. If you do, that means it’s going to look for a file system there when you boot. You probably boot without a CD in there more often than not.
The first question is: do you have a CD in the drive that has a proper file system on it? If not, mount won’t, and shouldn’t, work.
If you do, then (as root):
mount /cdrom
ought to be all you need to say with the fstab entry in place.
Configuring xmcd for Playing Audio CDs
Since audio CDs are NOT file systems, you can’t mount them without special software, such as the xmcd package:
- After install, start the configuration script:
cd /usr/X11R6/lib/X11/xmcd/config/
./config.sh
- Answer the questions in the script dialog.
| To get your CDROM specifications, enter dmesg | more |
Got this from the log file:
acd0: DVD-ROM <TOSHIBA DVD-ROM SD-C2502> at ata0-slave using PIO4
Note: If you try to mount an audio CD, you will get an error like ``cd9660: /dev/acd0c: Invalid argument’’. This is because mount only works on filesystems. Audio CDs do not have filesystems; they just have data. You need a program that reads audio CDs, such as the audio/xmcd port.
Installing a New Ethernet NIC
-
Insert the new card and boot up the system.
-
Run “dmesg” to find the name of the card. Look at the tail-end of the file. For example, “xe0” stands for the new Xircom card. Notice its MAC address:
xe0 at port 0x240-0x24f iomem 0xd5000-0xd5fff irq 11 slot 0 on pccard0
xe0: Xircom CE3, bonding version 0x45, 100Mbps capable
xe0: DingoID = 0x444b, RevisionID = 0x1, VendorID = 0
xe0: Ethernet address 00:10:a4:7e:c9:cf
- Insert the new card name into /etc/rc.conf and enable DHCP:
ifconfig_xe0="DHCP"
- Reboot the system. In the following case, several watchdog timeouts and card resets occurred before xe0 successfully performed an ARP and fetched an IP address from the dhcp server:
During bootup, these messages were displayed and logged inside “dmesg”:
xe0: watchdog timeout; resetting card
xe0: watchdog timeout; resetting card
xe0: watchdog timeout; resetting card
xe0: watchdog timeout; resetting card
Eventually, ifconfig got this:
xe0: flags=8843<UP,BROADCAST,RUNNING,SIMPLEX,MULTICAST> mtu 1500
        inet6 fe80::210:a4ff:fe7e:c9cf%xe0 prefixlen 64 scopeid 0x7
        inet 10.1.4.176 netmask 0xfffff800 broadcast 10.1.7.255
        ether 00:10:a4:7e:c9:cf
        media: Ethernet autoselect (100baseTX)
- Troubleshooting IRQ, Port, or IOMEM
Look at dmesg output to see whether anything else wants the same irq, port or iomem. If so, something needs to move. You have a built-in NIC, don’t you? You’re not trying to run dhcp on multiple interfaces simultaneously, are you?
Problem. Just got a new Ethernet Xircom PCMCIA card, but having a slight problem with it. Kept getting “watchdog timeout; resetting card” each time we booted the new card (xe0). Eventually the card SOMETIMES gets an ip address via dhcp, but not without going thorough lots of resets. Justin tells me “don’t worry about it”.
Solution. Go through the dmesg output and see what IRQs are being used for what. See whether there’s a free one. The handbook has a section about that and should tell you that there’s one, IRQ 2, I think) that isn’t really available. If you don’t have a free one, look for ones grabbed by something you don’t really have, like a second serial port. Take those out of your kernel config. Put a freed one in the config line for one of the NICs. Or if one is a pccard, there’s a syntax for giving an IRQ in the pccard file.
irq 9 was free. That is, it didn’t appear in the “dmesg” output.
2 and 9 are trick. Stay away from them. My “complete FreeBSD” is older than yours, but yours probably mentions this because it’s a legacy issue that hasn’t changed.
You must have a free one, probably 3. That’s the one for a second serial port. Don’t think we’ve seen laptop with two. Take sio1 out of your kernel config and 3 will be free. Toss sio2 and sio3, too, if they’re not commented out already. If you really need serial devices, get USB. That’s much more versatile.
So, in the kernel file I entered:
device xe irq 9
But then, after running the kernel via “usr/sbin/config my-kernel”, I get a syntax error on that line.
So, I tried putting this instead:
device xe at isa? port? irq 9
but I keep getting the syntax error on that line. Hmmm…. I’m not sure what to do now.
Or if one is a pccard, I think there’s a syntax for giving an IRQ in the pccard file.
Okay. Where is this pccard file? Should I be editing that instead of the kernel? Sigh …
/etc/defaults/pccard.conf. Those are defaults. Create /etc/pccard.conf with the entry you make. Crib from the defaults file. Look for xe entries and elaborate a likely one. See the pccard.conf man page.
DNS Resolution
It’s amazing how many things stop working when DNS isn’t working properly.
Example 1
Problem: From bsd, I couldn’t “ping” or “nslookup” a domain name, such as “cisco.com”.
A two part solution:
1) Put the LinkSys IP address in /etc/hosts:
192.168.1.1 greg.mcmillan.com
2) Create /etc/resolv.conf and insert the nameservers provided by your ISP:
nameserver 206.13.28.12 nameserver 206.13.29.12
The nameservers are tried in order. Make sure the primary is first; otherwise, the machine will hang intermittently.
Example 2
Couldn’t ssh into bsd1 from my home-winxp box (192.168.1.101) via the SSH Client. Would get the following syslog error:
Nov 13 04:30:47 bsd1 sshd[261]: fatal: Timeout before authentication for 192.168.1.101
Turns out, because my Internet connection was down, bsd1’s DNS could not resolve the “bogus” nameserver entries in /etc/resolve.conf. And takes a while if Reverse DNS is not set up .. Possibly longer than the default timeout of 120 seconds.
So, after I commented out the nameservers:
#nameserver 206.13.28.12 #nameserver 206.13.29.12
sshd started accepting client connections again.
Shell Scripting
A) A bunch of notes from bsd newbies:
A script is nothing more than a file that contains shell commands. But since UNIX shells have some programming constructs built in (conditionals, loops, etc), scripts are really programs, and not mere batch files. Bourne shells are good for writing scripts. One recommendation is to always use the plain vanilla “sh” for scripting.
How powerful are shell scripts? Consider that once the FreeBSD kernel has finished loading and initializing, virtually everything else at bootup is done through a shell script. All of the daily, weekly, and monthly security checks and reports are done with shell scripts.
Shell scripts are the glue that hold UNIX together. But they’re simple and versatile enough for even you to learn and use every day.
Shells differ in their programming constructs, so anything you learn in one shell may not be transferable to others. As a personal preference, I usually try to write scripts for /bin/sh (for portability), unless I need a ksh or bash construct. bash is a variant of sh, with a lot of bells and whistles added, so techniques that work in bash usually work in sh (and ksh).
The Bourne shell, sh, is the de facto standard. By default, FreeBSD gives root a C shell, csh. It is the traditional Berkeley shell, but is has some limitations. It’s scripting language is significantly different from the Bourne shell, sh.
B) Comments from Engineers
Jerry uses "tcsh"

From Rex:
My personal favorite shell is "tcsh". But I wouldn't recommend
you learn scripting using shells. They have become primitive
in their scripting functionality compared to Perl, Tck/Tk or
Python. I recommend you choose one of these and learn. BTW, what
are you trying to script?

from JohnZ:
I think I use tcsh, but it doesn't really matter to me.
I use expect and tcl for all the scripting I do because
that is what we use to write our regression scripts.

If you really want to go down the path of UNIX productivity,
learn emacs.  Its an editor, but -so- much more.

You can work within many split windows.
Do you telnet to other systems?  I use emacs to
capture all the debug I need.
CPU
CPU clock speed is bogus (i.e., 2 GhZ CPU). The thing that slows computers down these days is the speed of memory access. If your instructions execute faster, they just stall for longer periods of time on the memory. Talk to John Holst at procket. He can recommend things to do to the pc. Faster CPU clocks are not good investments. Get faster memory, but it’s expensive. Sometimes larger caches increase speed too.
Partitions and Disk Usage
Use the “du” command. It stands for Disk Usage. Try it with/without the -k option. It will count allocation units.
Use the “df” command to view my disk partitioning structure. For example, you can have many partitions:
/ = the root partition
usr = the user partition
the swap partition
$ df
Filesystem  1K-blocks     Used    Avail Capacity  Mounted on
/dev/ad0s2a    389128    61470   296528    17%    /
/dev/ad0s4e   5395143   899754  4063778    18%    /usr
/dev/ad0s1   12044976  5386968  6658008    45%    /dos
procfs              4        4        0   100%    /proc
Fstab for MSDOS Mounting
Fstab defines the filesystem or device to be mounted.
See http://www.freebsd.org/doc/en_US.ISO8859-1/books/handbook/book.html
For XP, might need to use “mount_ntfs”
The device should be /dev/ad0s1. Lose the /dos part of what you have there.
> greg-pc# mount -a
> msdos: /dev/ad0s1/dos: Operation not supported
> greg-pc#
> greg-pc# cat /etc/fstab
> # Device                Mountpoint      FStype  Options         Dump    Pass#
> /dev/ad0s3b             none            swap    sw              0       0
> /dev/ad0s2a             /               ufs     rw              1       1
> #/dev/X         /scratch                ufs     rw              2       2
> /dev/ad0s4e             /usr            ufs     rw              2       2
> /dev/acd0c              /cdrom          cd9660  ro,noauto       0       0
> /dev/ad0s1/dos          /msdos          msdos   rw              0       0
> proc                    /proc           procfs  rw              0       0
> greg-pc#
> greg-pc#
> greg-pc# pwd
> /
>
> Jerry Kreuscher writes:
>  > Greg McMillan wrote (on Monday Oct  8, at 12:03:01):
>  >
>  > > Any idea what I'm doing wrong?
>  > >
>  >
>  > Try it with msdos for the fstype instead of dos.
>  >
>  > > greg-pc# mount -a
>  > > mount: exec mount_dos not found in /sbin, /usr/sbin: No such file or directory
>  > > greg-pc# cat /etc/fstab
>  > > # Device                Mountpoint      FStype  Options         Dump    Pass#
>  > > /dev/ad0s3b             none            swap    sw              0       0
>  > > /dev/ad0s2a             /               ufs     rw              1       1
>  > > #/dev/X         /scratch                ufs     rw              2       2
>  > > /dev/ad0s4e             /usr            ufs     rw              2       2
>  > > /dev/acd0c              /cdrom          cd9660  ro,noauto       0       0
>  > > /dev/ad0s1/dos          /msdos          dos     rw              0       0
>  > > proc                    /proc           procfs  rw              0       0
>  > > greg-pc#
Jerry entered “cat /etc/fstab”. We need to edit this file, so we can comment off this “X”. Jerry then entered “mount -a”. Then, “mount /usr”. Then, “vi /etc/fstab”. Jerry put a “#” in front of the line “/dev/X”. Then, “mount -a”. Then, “Ctrl d”. The command “mount -a” mounts everything that is in the fstab that is auto mountable. However, sometimes I’ll have fstab entries that don’t support auto mount (wait to be told to auto mount).
Windows Killed Boot Manager
1) Boot the FreeBSD cdrom again, skip kernel install, and go to the Custom installation menu item.
2) Choose Partition
3) Select the drive which used to contain your boot manager (the first one) and when you come to the partition editor for it, as the very first thing (e.g. do not make any changes) select (W)rite. Simply press the “w” key. This will ask for confirmation, say yes, and when you get the Boot Manager selection prompt, be sure to select “Boot Manager.” This will re-write the boot manager to disk.
4) Quit out of the installation menu and reboot off the hard disk as normal.
Custom Kernel
Each item you delete that the system does not support saves you one interrupt. When reconfiguring a kernel, it is always a good idea to keep a kernel that is known to work on hand.
-
Note the existing installed kernel at bootup:
vi /var/log/messages Feb 25 10:09:49 bsd kernel: root@releng1.nyi.freebsd.org:/usr/obj/usr/src/sys/GENERIC i386 -
Collect all driver and controller information for the machine:
dmesg vi /var/log/messages pciconf -lv -
The kernel source must be installed. Ensure /usr/src/ exists and is not empty.
cd /usr/src ls -
Create custom kernel:
sudo root cd /usr/src/sys/i386/conf cp GENERIC GREGKERNEL vim GREGKERNEL -
Build and install the custom kernel:
cp GREGKERNEL /usr/src make buildkernel KERNCONF=GREGKERNEL make installkernel KERNCONF=GREGKERNEL -
Reboot machine:
sync;reboot -
Confirm custom kernel was loaded:
 vi /var/log/messages

 Feb 26 00:36:34 bsd kernel: greg@bsd:/usr/obj/usr/src/sys/GREGKERNEL i386
PS/2 Mouse Problems
Problem description. Mouse worked fine without X. After X is started, the mouse cursor accelerates and bounces off the monitor.
Solution. Put this in /etc/X11/XFConfig
Section “InputDevice”
Identifier and driver
Identifier  "Mouse1"
Driver      "mouse"
Option "Protocol"    "SysMouse"
Option "Device"      "/dev/sysmouse"
Having “PS/2” as the mouse protocol broke the mouse. It needed to be changed to “SysMouse”. Found solution at http://www.xfree86.org/4.4.0/mouse3.html
FreeBSD supports the “SysMouse” protocol which must be specified when the moused daemon is running in versions 2.2.1 or later.
When running the mouseddaemon, you must always specify the /dev/sysmouse device and the “SysMouse” protocol to the X server, regardless of the actual type of your mouse.
Ripping CDs
dagrab is what you want for getting tracks off of audio CDs. Be sure
not to default the “-n
lame is a program that can make mp3s from the wav files dagrab produces. There are probably other ways, maybe better ways, but I haven’t looked further.
Using fvwm2 instead of twm
Dino uses fvwm2. Here is a copy of his .fvwm2rc file:
```
------------------------------------------------------------------------

# this is a bare bones sample .fvwm2rc/system.fvwm2rc file for fvwm-2.
# It should be customized before install.  See other sample .fvwm2rc files
# for hints, as well as pointers from the various links on the official
# fvwm web page (see the FAQ).

TitleStyle ActiveUp (HGradient 128 2 #c06077 50 white 50 #c06077 -- Flat) ActiveDown (HGradient 128 2 #c06077 50 white 50 #c06077 -- Flat) Inactive (HGradient 128 2 #40a0c0 50 white 50 #40a0c0 -- Flat)
#TitleStyle ActiveUp (Solid red -- Flat) ActiveDown (Solid red -- Flat) Inactive (Solid blue -- Flat)

EdgeResistance 250 10
EdgeScroll 100 100
ClickTime 750

# make sure these fonts exist on your system:
Font			-adobe-helvetica-medium-r-*-*-12-*-*-*-*-*-*-*
WindowFont		-adobe-helvetica-bold-r-*-*-12-*-*-*-*-*-*-*
IconFont		-adobe-helvetica-bold-r-*-*-10-*-*-*-*-*-*-*

HilightColor black #c06077
DeskTopSize 2x2
MenuStyle Black #c0c0c0 grey51 -adobe-helvetica-medium-r-*-*-14-*-*-*-*-*-*-* fvwm

ColormapFocus FollowsMouse

# default Styles:
Style "*"           BorderWidth 7, HandleWidth 7
Style "*"           Icon unknown1.xpm, Black/#60a0c0
Style "*"           Color Black/#60a0c0
Style "*"           MWMFunctions, MWMDecor, HintOverride
Style "*"           DecorateTransient, NoPPosition
Style "*"           IconBox 0 -10 -280 -1
Style "*"           FocusFollowsMouse
Style "*"           RandomPlacement, SmartPlacement

# Styles for various Fvwm modules:
Style "Fvwm*"       NoTitle, Sticky, WindowListSkip
Style "Fvwm*"       BorderWidth 2, CirculateSkipIcon, CirculateSkip
#Style "FvwmPager"   StaysOnTop
Style "FvwmBanner"  StaysOnTop
Style "FvwmButtons" Icon toolbox.xpm, ClickToFocus

# Styles for your common terminal emulator programs:
Style "XTerm"       Icon xterm.xpm, SloppyFocus

# Styles for various common programs:
Style "*lock"       NoTitle, NoHandles, Sticky, WindowListSkip, ClickToFocus
Style "xbiff"       NoTitle, Sticky, WindowListSkip, ClickToFocus
Style "xcalc"       Icon xcalc.xpm, NoButton 2,RandomPlacement,ClickToFocus
Style "xmh"         Icon mail1.xpm, NoIconTitle,StickyIcon
Style "xmh"	    RandomPlacement, NoButton 2
Style "xman"	    Icon xman.xpm, RandomPlacement, ClickToFocus
Style "xmag"	    Icon mag_glass.xpm, RandomPlacement, ClickToFocus
Style "xgraph"      Icon graphs.xpm, RandomPlacement, ClickToFocus
Style "xmosaic"     Color Green/Yellow, ClickToFocus
Style "xbatt"       NoTitle, NoHandles, Sticky


# some simple default key bindings:
Key Next         A       SCM     Next [*] Focus
Key Prior        A       SCM     Prev [*] Focus

# some simple default mouse bindings:
#   for the root window:
Mouse 1	R   	A       Menu RootMenu Nop
Mouse 2	R    	A      	Menu Window-Ops Nop
Mouse 3	R    	A      	WindowList

#   for the title bar buttons:
Mouse 0	1    	A      	Menu Window-Ops2 Close
Mouse 0	2    	A     	Maximize-Func
Mouse 0	4    	A     	Iconify

#   for other parts of the window/borders/icons:
Mouse 1	F	A	Resize-or-Raise
Mouse 1	TS	A	Move-or-Raise
Mouse 1	I	A	Move-or-Iconify
Mouse 2	I	A	Iconify
Mouse 2	FST	A	Menu Window-Ops2 Nop
Mouse 3	TSIF	A	RaiseLower

######################## Initialization Functions ############################
AddToFunc InitFunction
+			  "I" Module FvwmPager 0 0
+			  "I" exec xsetroot -solid black
#+			  "I" exec xon miata xbiff -file /var/spool/mail/vkl

AddToFunc RestartFunction
+			  "I" Module FvwmPager 0 0
+			  "I" exec xsetroot -solid black
#+			  "I" exec xon miata xbiff -file /var/spool/mail/vkl


######################## Menus ###################
AddToMenu RootMenu	"Menu"		Title
+			"xterm"		Exec xterm
+			"emacs"		Exec xterm -e emacs -nw
+                       "xlock"         Exec exec xlock -mode random
+			"sleep"		Exec zzz
+			"Utilities"	Title
+			"top"		Exec exec xterm -T Top -n Top -e top -s 1
+			"netscape"	Exec netscape
+			"sdr"		Exec /usr/X11R6/bin/sdr
+			"aim"		Exec /usr/local/bin/aim
+			"xcalc"	 	Exec exec xcalc
+			"hexcalc"	Exec exec hexcalc
+			"ethereal"	Exec exec ethereal
+                       "xrdb"          Exec xrdb -load $HOME/.Xdefaults
#+                       "Utilities"     Popup Utilities
+			"Fvwm"		Title
+			"Modules"	Popup Module-Popup
+                       "Window Ops"    Popup Window-Ops
+                       "Config Ops"    Popup Misc-Ops
+			""		Nop
+			"Exit Fvwm"	Popup Quit-Verify

AddToMenu Utilities     "Utilities" Title
+			"top"		Exec exec xterm -T Top -n Top -e top
+			"netscape"	Exec netscape
+			"sdr"		Exec sdr
+			"xcalc"	 	Exec exec xcalc
+			"hexcalc"	Exec exec hexcalc
+			"ethereal"	Exec exec ethereal
+                       "xrdb"          Exec xrdb -load $HOME/.Xdefaults

AddToMenu Misc-Ops "Misc Config Opts" Title
+                  "Sloppy Focus"        ChangeDefaultFocus SloppyFocus
+                  "Click To Focus"      ChangeDefaultFocus ClickToFocus
+                  "Focus Follows Mouse" ChangeDefaultFocus FocusFollowsMouse
+                  "" Nop
+                  "Colormap Follows Mouse" ColormapFocus FollowsMouse
+                  "Colormap Follows Focus" ColormapFocus FollowsFocus
+                  "" Nop
+                  "Full Paging ON"         EdgeScroll 100 100
+                  "All Paging OFF"         EdgeScroll 0 0
+                  "Horizontal Paging Only" EdgeScroll 100 0
+                  "Vertical Paging Only"   EdgeScroll 0 100
+                  "Partial Paging"         EdgeScroll 50 50
+                  "Full Paging && Edge Wrap" EdgeScroll 100000 100000

AddToMenu Window-Ops	"Window Ops"	Title
+			"Move"		Move
+			"Resize"	Resize
+			"Raise"		Raise
+			"Lower"		Lower
+		 	"(De)Iconify"	Iconify
+			"(Un)Stick"	Stick
+			"(Un)Maximize"	Maximize
+			""		Nop
+			"Delete"	Delete
+			"Close"		Close
+			"Destroy"	Destroy
+			""		Nop
+			"Refresh Window" RefreshWindow
+                       "Refresh Screen"   Refresh
+                       "Recapture Screen" Recapture

AddToMenu Window-Ops2	"&Move"		Move
+			"&Resize"	Resize
+			"R&aise"	Raise
+			"&Lower"	Lower
+			"(De)&Iconify"	Iconify
+			"(Un)&Stick"	Stick
+                       "(Un)Ma&ximize" Maximize
+			""		Nop
+			"&Delete"	Delete
+			"&Close"	Close
+			"Destroy"	Destroy
+			""		Nop
+			"ScrollBar" 	Module FvwmScroll 2 2
+			"Print"         PrintFunction
+                       "Print Reverse" PrintReverseFunction

AddToMenu Module-Popup	"FvwmModules"	Title
+			"Identify"	Module	FvwmIdent
+			"Talk"  	Module	FvwmTalk
+			""		Nop
+			"Button-Bar"	Module	FvwmButtons
+			"Pager"		Module  FvwmPager 0 0
+			"Pager (2 desks)" Module  FvwmPager 0 1
+			"WinList"	Module  FvwmWinList
+			""		Nop
+			"Banner"	Module	FvwmBanner
+                       "ScrollBar"     Module  FvwmScroll 50 50
+			"Background"	Module  FvwmBacker
+                       "AutoRaise"     Module  FvwmAuto 200 Raise Nop
+                       "Stop AutoRaise" KillModule FvwmAuto
+			""		Nop
+			"IconBox"	Module	FvwmIconBox
+                       "IconMan"       Module  FvwmIconMan
+			""		Nop
+                       "Form - Rlogin"      Module FvwmForm Rlogin
+                       "Form - MyFvwmTalk"  Module FvwmForm MyFvwmTalk
+                       "Form - QuitVerify"  Module FvwmForm QuitVerify

AddToMenu Quit-Verify 	"Quit Fvwm"         Quit
+                       "Restart"           Restart fvwm


######################## Sample Functions ##########################

AddToFunc MailFunction	   "I" Next [$0] Iconify -1
+		           "I" Next [$0] Focus
+			   "I" None [$0] Exec $0 $1

AddToFunc Move-or-Raise		"I" Raise
+				"M" Move
+  				"D" Lower

AddToFunc Move-or-Raise2	"M" Raise
+				"M" Move
+  				"D" Lower

AddToFunc Maximize-Func		"M" Maximize	 0 100
+				"C" Maximize	 0 80
+				"D" Maximize	 100 100

AddToFunc Move-or-Iconify	"I" Raise
+				"M" Move
+				"D" Iconify

AddToFunc Resize-or-Raise	"I" Raise
+				"M" Resize
+				"D" Lower

AddToFunc Resize-or-Raise2	"M" Raise
+				"M" Resize
+				"D" Lower

AddToFunc PrintFunction		"I" Raise
+				"I" Exec xdpr -id $w

AddToFunc PrintReverseFunction  "I" Raise
+                               "I" Exec xdpr 1/2 -h -rv -id $w

AddToFunc Iconify-and-Raise     "I" Iconify
+                               "I" Raise

# RLOGIN machine fg bg
AddToFunc RLOGIN "I" Exec xterm -fg $1 -bg $2 -e rlogin $0 -8

# TELNET machine fg bg
AddToFunc TELNET "I" Exec xterm -fg $1 -bg $2 -e telnet $0

AddToFunc FocusAndWarp "I" Focus
+                      "I" WarpToWindow 2p 2p

AddToFunc DeiconifyFocusAndWarp "I" Iconify -1
+                               "I" FocusAndWarp

AddToFunc ChangeDefaultFocus "I" Style "*" $0
+                            "I" Recapture

################## FvwmButtons button-bar ################################
*FvwmButtonsGeometry 520x100-1-1
*FvwmButtonsBack bisque3
*FvwmButtons(Frame 2 Padding 2 2 Container(Rows 2 Columns 5 Frame 1 \
                                           Padding 10 0))
*FvwmButtons(3x2 Frame 2 Swallow "FvwmIconMan" "Module FvwmIconMan")
*FvwmButtons(1x2 Frame 2 Swallow(UseOld) "FvwmPager" "Module FvwmPager 0 0")
*FvwmButtons(1x2 Frame 0 Container(Rows 2 Columns 2 Frame 0))
*FvwmButtons(Frame 2 Swallow(UseOld,NoHints,Respawn) "xbiff" `Exec exec xbiff -bg bisque3`)
*FvwmButtons(Frame 3 Swallow(UseOld,NoHints,Respawn) "xclock" `Exec exec xclock -bg bisque3 -fg black -hd black -hl black -padding 0 -update 1`)
*FvwmButtons(2x1 Frame 2 Swallow(UseOld,NoHints,Respawn) "xload" `Exec exec xload -bg bisque3 -fg black -update 5 -nolabel`)
*FvwmButtons(End)
*FvwmButtons(End)

########################## Icon Manager ####################################
# this FvwmIconMan setup is for swallowing in above button bar example
*FvwmIconMan*numManagers 1
*FvwmIconMan*Resolution  page
*FvwmIconMan*background  bisque3
*FvwmIconMan*foreground  black
*FvwmIconMan*font        7x13bold
*FvwmIconMan*format      "%t"
*FvwmIconMan*action      Mouse   1 N sendcommand Focus, sendcommand "Iconify"
*FvwmIconMan*action      Mouse   2 N sendcommand "Iconify 1"
*FvwmIconMan*action      Mouse   3 N sendcommand "FvwmIdent"
*FvwmIconMan*followfocus true
*FvwmIconMan*sort        false
*FvwmIconMan*plainbutton          up black bisque3
*FvwmIconMan*selectbutton         down black bisque3
*FvwmIconMan*focusbutton          up yellow firebrick
*FvwmIconMan*focusandselectButton down yellow firebrick
*FvwmIconMan*dontshow icon=Untitled name=Untitled
#*FvwmIconMan*drawicons true
*FvwmIconMan*buttongeometry  300x0
*FvwmIconMan*managergeometry 1x5

########################## Window-Identifier ###############################
# Just choose colors and a fonts
*FvwmIdentBack MidnightBlue
*FvwmIdentFore Yellow
*FvwmIdentFont -adobe-helvetica-medium-r-*-*-12-*-*-*-*-*-*-*

########################### Pager #########################################
*FvwmPagerBack grey60
*FvwmPagerFore black
*FvwmPagerFont -adobe-helvetica-bold-r-*-*-10-*-*-*-*-*-*-*
*FvwmPagerHilight #c0c0c0
*FvwmPagerGeometry 110x54-0-0
*FvwmPagerLabel 0 Desktop
*FvwmPagerSmallFont 5x8

##########################FvwmWinList##################################
*FvwmWinListBack #908090
*FvwmWinListFore Black
*FvwmWinListFont -adobe-helvetica-bold-r-*-*-10-*-*-*-*-*-*-*
*FvwmWinListAction Click1 Iconify -1,Focus
*FvwmWinListAction Click2 Iconify
*FvwmWinListAction Click3 Module "FvwmIdent" FvwmIdent
*FvwmWinListUseSkipList
*FvwmWinListGeometry +0-1


*FvwmBackerDesk 0 -solid steelblue
*FvwmBackerDesk 1 -solid midnightblue

*FvwmScrollBack grey40
*FvwmScrollFore green

############################################################
############################################################
# Note that icons are shown in the module
#    only if NoIcon commnand is applied.
#Style     "*"  NoIcon

############################################################
*FvwmIconBoxIconBack    #cfcfcf
*FvwmIconBoxIconHiFore  black
*FvwmIconBoxIconHiBack  LightSkyBlue
*FvwmIconBoxBack        #5f9ea0
#*FvwmIconBoxFore       blue
*FvwmIconBoxGeometry    5x1+0+0
*FvwmIconBoxMaxIconSize 64x38
*FvwmIconBoxFont        -adobe-helvetica-medium-r-*-*-12-*-*-*-*-*-*-*
*FvwmIconBoxSortIcons   IconName
*FvwmIconBoxPadding     4
*FvwmIconBoxLines       10
*FvwmIconBoxSBWidth     11
*FvwmIconBoxPlacement   Left Top
*FvwmIconBoxPixmap      fvwm.xpm
#*FvwmIconBoxHideSC Horizontal
*FvwmIconBoxSetWMIconSize
*FvwmIconBoxHilightFocusWin
#*FvwmIconBoxResolution          Desk
*FvwmIconBoxMouse       1       Click           RaiseLower
*FvwmIconBoxMouse       1       DoubleClick     Iconify
*FvwmIconBoxMouse       2       Click           Iconify -1, Focus
*FvwmIconBoxMouse       3       Click           Module FvwmIdent
*FvwmIconBoxKey         r       RaiseLower
*FvwmIconBoxKey         space   Iconify
*FvwmIconBoxKey         d       Close
*FvwmIconBoxKey         n       Next
*FvwmIconBoxKey         p       Prev
*FvwmIconBoxKey         h       Left
*FvwmIconBoxKey         j       Down
*FvwmIconBoxKey         k       Up
*FvwmIconBoxKey         l       Right
#
# Icon file specifications
#
# Mostly, you don't have to specify icon files, as FvwmIconBox now
# reads icon files specified in Style commands.
#
*FvwmIconBox            "Fvwm*"         -

# FvwmForm alias - rlogin or telnet to host via xterm
*RloginWarpPointer
*RloginFont         *helvetica*m*r*n*12*
*RloginButtonFont   *helvetica*m*o*n*12*
*RloginInputFont    *cour*m*r*n*12*
*RloginFore         Black
*RloginBack         Light Gray
*RloginItemFore          Wheat
*RloginItemBack          Gray50
# begin items
*RloginLine         center
*RloginText         "Login to Remote Host"
*RloginLine         center
*RloginText         "Host:"
*RloginInput        HostName  30   ""
*RloginLine         center
*RloginSelection    meth single
*RloginChoice       TN TN off "telnet"
*RloginChoice       RL RL on "rlogin"
*RloginSelection    UserSel   single
#*RloginChoice       Default   Default   on   "same user"
#*RloginChoice       Custom    Custom    off  "user:"
*RloginText         "(Userid:"
*RloginInput        UserName  10   ""
*RloginText         ")"
*RloginLine         center
*RloginText         "FG:"
*RloginInput        FgColor 15 ""
*RloginText         "BG:"
*RloginInput        BgColor 15 ""
*RloginLine         expand
*RloginButton       quit "Login" ^M
*RloginCommand Exec xterm  $(FgColor?-fg $(FgColor)) $(BgColor?-bg $(BgColor)) -T xterm@$(HostName) -e $(RL?rlogin) $(TN?telnet) $(HostName) $(RL?-8 $(UserName?-l $(UserName)))
*RloginButton       restart   "Clear"
*RloginCommand Beep
*RloginButton       quit "Cancel"
*RloginCommand Nop

# FvwmForm alias - query exit ala mwm
*QuitVerifyGrabServer
*QuitVerifyWarpPointer
*QuitVerifyFont          *helvetica*m*r*n*14*
#*QuitVerifyButtonFont    *helvetica*m*o*n*14*
*QuitVerifyButtonFont    7x13bold
*QuitVerifyFore          Black
*QuitVerifyBack          Light Gray
*QuitVerifyItemFore Wheat
*QuitVerifyItemBack Gray50
# begin items
*QuitVerifyLine          center
*QuitVerifyText          "Do you really want to exit FVWM?"
*QuitVerifyLine          expand
*QuitVerifyButton   quit      " Exit "
*QuitVerifyCommand  Quit
*QuitVerifyButton   quit      "Cancel"
*QuitVerifyCommand  Nop

# MyTalk & MyFvwmTalk from Dave Goldberg
# MyTalk Form - dissappears after use
*MyTalkWarpPointer
*MyTalkFont *helvetica*m*r*n*14*
*MyTalkButtonFont *helvetica*m*o*n*14*
*MyTalkInputFont *cour*m*r*n*14*
*MyTalkFore Red
*MyTalkBack Gray
*MyTalkItemFore Blue
*MyTalkItemBack Gray
*MyTalkLine center
*MyTalkText "Fvwm Function"
*MyTalkInput Func 40 ""
*MyTalkLine expand
*MyTalkButton quit "Run" ^M
*MyTalkCommand $(Func)
*MyTalkButton restart "Clear" ^R
*MyTalkButton quit "Cancel" ^C
*MyTalkCommand Nop
# MyFvwmTalk Form - sticks around
*MyFvwmTalkWarpPointer
*MyFvwmTalkFont *helvetica*m*r*n*14*
*MyFvwmTalkButtonFont *helvetica*m*o*n*14*
*MyFvwmTalkInputFont *cour*m*r*n*14*
*MyFvwmTalkFore Red
*MyFvwmTalkBack Gray
*MyFvwmTalkItemFore Blue
*MyFvwmTalkItemBack Gray
*MyFvwmTalkLine center
*MyFvwmTalkText "Fvwm Function"
*MyFvwmTalkInput Func 40 ""
*MyFvwmTalkLine expand
*MyFvwmTalkButton restart "Run" ^M
*MyFvwmTalkCommand $(Func)
*MyFvwmTalkButton restart "Clear" ^R
*MyFvwmTalkCommand Nop
*MyFvwmTalkButton restart "Iconify" ^Z
*MyFvwmTalkCommand Next [MyFvwmTalk] Iconify
*MyFvwmTalkButton quit "Quit" ^C
*MyFvwmTalkCommand Nop

# to change banner pixmap
#*FvwmBannerPixmap fvwm3.xpm
#*FvwmBannerTimeout 2
```
CD Burning
See “man burncd”
http://www.redantigua.com/burncd.html
To unmount the existing cd drive, which then enables me to eject a disc:
umount /dev/acd0c
See the before and after affects of umount:
bsd1 /usr/source-tgz/disc1.iso.4.10.freebsd> df -h
Filesystem    Size   Used  Avail Capacity  Mounted on
/dev/ad0s1a   126M    49M    67M    42%    /
/dev/ad0s1f   252M    22K   232M     0%    /tmp
/dev/ad0s1g   229G   5.8G   205G     3%    /usr
/dev/ad0s1e   252M   3.4M   228M     1%    /var
procfs        4.0K   4.0K     0B   100%    /proc
/dev/acd0c    610M   610M     0B   100%    /dist
bsd1 /usr/source-tgz/disc1.iso.4.10.freebsd>
bsd1 /usr/source-tgz/disc1.iso.4.10.freebsd> df -h
Filesystem    Size   Used  Avail Capacity  Mounted on
/dev/ad0s1a   126M    49M    67M    42%    /
/dev/ad0s1f   252M    22K   232M     0%    /tmp
/dev/ad0s1g   229G   5.8G   205G     3%    /usr
/dev/ad0s1e   252M   3.4M   228M     1%    /var
procfs        4.0K   4.0K     0B   100%    /proc
But when it’s mounted, I can cd to /cdrom mountpoint:
bsd1 /usr/source-tgz/disc1.iso.4.10.freebsd> cd /cdrom
bsd1 /cdrom> pwd
/cdrom
bsd1 /cdrom> ls
bsd1 /cdrom> df -h
Filesystem    Size   Used  Avail Capacity  Mounted on
/dev/ad0s1a   126M    49M    66M    43%    /
/dev/ad0s1f   252M    22K   232M     0%    /tmp
/dev/ad0s1g   229G   5.8G   205G     3%    /usr
/dev/ad0s1e   252M   3.4M   228M     1%    /var
procfs        4.0K   4.0K     0B   100%    /proc
/dev/acd0c    610M   610M     0B   100%    /dist
but now I get some errors:
bsd1 /usr/source-tgz/disc1.iso.4.10.freebsd> umount /dev/acd0c
bsd1 /usr/source-tgz/disc1.iso.4.10.freebsd> burncd -f /dev/acd0c -s 4 -e data 4.10-RELEASE-i386-disc1.iso fixate
burncd: ioctl(CDRIOCNEXTWRITEABLEADDR): Input/output error
techtip says do this:
burncd -f /dev/acd0c blank
burncd -f /dev/acd0c data sample.iso fixate
Mounting a Second Hard Drive for Backups
For quick system backups, tar select directories:
tar zcf backup-criticals.tgz docs/ root/ etc/ source-tgz/ xml/ finances/ employees.org/ resumes/ commands/
mv backup-criticals.tgz /ad1s1e-backup
-
Physically set the jumper as slave on the second drive and connect the scsi and power connector.
-
Create a FreeBSD file system on the drive and reboot the box.
-
According to /var/log/messages, the names of my hard drives are ad0 and ad1:
Aug 31 00:12:25 bsd1 /kernel: ad0: 239372MB <Maxtor 6Y250P0> [486344/16/63] at ata0-master UDMA100 Aug 31 00:12:25 bsd1 /kernel: ad1: 32253MB <HDS722540VLAT20> [65531/16/63] at ata0-slave UDMA100 -
Create a mount point:
bsd1# cd / bsd1# mkdir ad1-slave -
Mount the drive
On the first try, mounting the drive itself on “ad1” didn’t work:
```
bsd1# mount /dev/ad1 /ad1-slave
mount: /dev/ad1 /ad1-slave: incorrect super block
```
After looking in stand/sysinstall, found out the actual slice name given to the mountable file system was “ad1s1”. The “s1” stands for slice 1. Mounting that worked:
```
bsd1# mount /dev/ad1s1 /ad1-slave/
bsd1# df
Filesystem  1K-blocks    Used     Avail Capacity  Mounted on
/dev/ad0s1a   5040174   42640   4594322     1%    /
/dev/ad0s1e   1007950       2    927312     0%    /scratch
/dev/ad0s1f 234458900 1011908 214690280     0%    /usr
procfs              4       4         0   100%    /proc
/dev/acd0c     636256  636256         0   100%    /dist
/dev/ad1s1    1007950   37816    889498     4%    /ad1-slave
bsd1# cd /ad1-slave/
bsd1# ls
.cshrc          boot            dist            kernel.GENERIC  root            tmp
.profile        cdrom           etc             mnt             sbin            usr
COPYRIGHT       compat          home            modules         stand           var
bin             dev             kernel          proc            sys
```
Ooops. Mounted wrong slice. “df -h” tells me I mounted a small slice. It’s probably “root” (not the big /usr):
```
bsd1# df -h
Filesystem    Size   Used  Avail Capacity  Mounted on
/dev/ad0s1a   4.8G    42M   4.4G     1%    /
/dev/ad0s1e   984M   2.0K   906M     0%    /scratch
/dev/ad0s1f   224G   988M   205G     0%    /usr
procfs        4.0K   4.0K     0B   100%    /proc
/dev/acd0c    621M   621M     0B   100%    /dist
/dev/ad1s1    984M    37M   869M     4%    /ad1-slave
```
So, use the “disklabel” utility to discover disk info. Specifically, looks like partition “e” has a size of 62422288:
```
bsd1# disklabel -r /dev/ad1s1
# /dev/ad1s1:
type: ESDI
disk: ad1s1
label:
flags:
bytes/sector: 512
sectors/track: 63
tracks/cylinder: 255
sectors/cylinder: 16065
cylinders: 4110
sectors/unit: 66043152
rpm: 3600
interleave: 1
trackskew: 0
cylinderskew: 0
headswitch: 0           # milliseconds
track-to-track seek: 0  # milliseconds
drivedata: 0

8 partitions:
#        size   offset    fstype   [fsize bsize bps/cpg]
  a:  2048000        0    4.2BSD     2048 16384    90   # (Cyl.    0 - 127*)
  b:  1572864  2048000      swap                        # (Cyl.  127*- 225*)
  c: 66043152        0    unused        0     0         # (Cyl.    0 - 4110*)
  e: 62422288  3620864    4.2BSD     2048 16384    89   # (Cyl.  225*- 4110*)
```
Tried mouting e. That fixed it. That slice size is 29G:
```
bsd1# mount /dev/ad1s1e /ad1-slave/
bsd1# df -h
Filesystem    Size   Used  Avail Capacity  Mounted on
/dev/ad0s1a   4.8G    42M   4.4G     1%    /
/dev/ad0s1e   984M   2.0K   906M     0%    /scratch
/dev/ad0s1f   224G   988M   205G     0%    /usr
procfs        4.0K   4.0K     0B   100%    /proc
/dev/acd0c    621M   621M     0B   100%    /dist
/dev/ad1s1e    29G   693M    26G     3%    /ad1-slave
```
-
Now put the following line in /etc/fstab and test the mount. Make sure to specify the FreeBSD universal file system (ufs):
 /dev/ad1s1e             /ad1s1e-backup  ufs     rw              0       0

 bsd1# mount -a
 bsd1# df -h
 Filesystem    Size   Used  Avail Capacity  Mounted on
 /dev/ad0s1a   4.8G    42M   4.4G     1%    /
 /dev/ad0s1e   984M   2.0K   906M     0%    /scratch
 /dev/ad0s1f   224G   988M   205G     0%    /usr
 procfs        4.0K   4.0K     0B   100%    /proc
 /dev/acd0c    621M   621M     0B   100%    /dist
 /dev/ad1s1e    29G   693M    26G     3%    /ad1s1e-backup
Next time I reboot the box, /dev/ad1s1e will be auto mounted.
-
Test data backup is working and the second hard disk is bootable.
 cd /
 touch testfile
 mv testfile /ad1s1e-backup
shutdown the bsd1 disconnect the primary drive (ad0). It’s “dead”. power up the boot manager now lets me boot ad1 as primary drive cd /usr notice “testfile” is present in /usr
The “mv” operations and drive disaster recovery worked!!!!
Misc fstab notes. Once had to enter "cat /etc/fstab". Need to edit this file to
to comment off this "X". Then entered "mount -a". Then,
"mount /usr". Then, "vi /etc/fstab". Put a "#" in front of
the line "/dev/X". Then, "mount -a". Then, "Ctrl d". The command
"mount -a" mounts everything that is in the fstab that is
auto mountable. However, sometimes we have fstab entries that
don't support auto mount (wait to be told to auto mount).
NTP
-
Set up the system files:
Specify the NTP devices and drift file in /etc/ntp.conf:
 server 140.142.16.34
 server  146.186.218.60
 server 203.21.37.18

 driftfile /etc/ntp.drift
 logfile /var/log/ntp.log
Create the drift file that records information about the (in)accuracy of the local system’s clock. Also create the log file:
 touch /etc/ntp.drift
 touch /var/log/ntp.log
Enable NTP daemon in rc.conf:
xntpd_enable="YES" -
Start xntpd process:
ntpd -c /etc/ntp.conf -l /var/log/ntp.logLook at the log file:
 bsd1 /root> more /var/log/ntp.log
 12 Sep 15:34:04 ntpd[278]: logging to file /var/log/ntp.log
 12 Sep 15:34:04 ntpd[278]: ntpd 4.1.0-a Tue May 25 21:15:34 GMT 2004 (1)
 12 Sep 15:34:04 ntpd[278]: kernel time discipline status 2040
 12 Sep 15:34:04 ntpd[278]: Un-parsable frequency in /etc/ntp.drift
The “Un-parsable frequency” message is simply the result of an initiallly empty /etc/ntp.drift file and hence can be ignored. The server will store a value in that file after some time.
-
Use the NTP query program to print a list of the peers known to the server as well as a summary of their state. A “*” in front of the peer indicates successful synchronization:
 bsd1 /root> ntpq -p
      remote           refid      st t when poll reach   delay   offset  jitter
 ==============================================================================
 * bigben.cac.wash .USNO.           1 u   22   64    7   42.230  -56.434   9.399
 + b50.cede.psu.ed avi-lis.gw.ligh  2 u   13   64    7  103.876  -59.719   9.158
   ns.saard.net    0.0.0.0         16 u    -   64    0    0.000    0.000 4000.00
Enter ntpq interactive mode and collect more stats:
 bsd1 /root> ntpq
 ntpq> ?
 Commands available:
 addvars        associations   authenticate   cl             clearvars
 clocklist      clockvar       cooked         cv             debug
 delay          exit           help           host           hostnames
 keyid          keytype        lassociations  lopeers        lpassociations
 lpeers         mreadlist      mreadvar       mrl            mrv
 ntpversion     opeers         passociations  passwd         peers
 poll           pstatus        quit           raw            readlist
 readvar        rl             rmvars         rv             showvars
 timeout        version        writelist      writevar

 ntpq> pe
      remote           refid      st t when poll reach   delay   offset  jitter
 ==============================================================================
 *bigben.cac.wash .USNO.           1 u    4   64  377   43.348  -106.55  26.618
 +b50.cede.psu.ed gps1.tns.its.ps  2 u    3   64  377  103.536  -73.528  25.553
  ns.saard.net    0.0.0.0         16 u    -  128    0    0.000    0.000 4000.00
 ntpq> as
 ind assID status  conf reach auth condition  last_event cnt
 ===========================================================
   1 46420  9624   yes   yes  none  sys.peer   reachable  2
   2 46421  9424   yes   yes  none  candidat   reachable  2
   3 46422  8000   yes   yes  none    reject
 ntpq> rv
 status=0674 leap_none, sync_ntp, 7 events, event_peer/strat_chg,
 version="ntpd 4.1.0-a Tue May 25 21:15:34 GMT 2004 (1)",
 processor="i386", system="FreeBSD4.10-RELEASE", leap=00, stratum=2,
 precision=-20, rootdelay=43.345, rootdispersion=25.513, peer=46420,
 refid=bigben.cac.washington.edu,
 reftime=c4ef547c.9aa6e32e  Sun, Sep 12 2004 16:04:28.604, poll=6,
 clock=c4ef5482.9e62888b  Sun, Sep 12 2004 16:04:34.618, state=4,
 offset=-68.212, frequency=-32.194, jitter=22.559, stability=11.297
Notes: The local time (reftime=) was “Sep 12 2004 16:04:28” when the local clock was last updated. If the local clock had never been synchronized, the value would be zero: reftime=00000000.00000000
Th time of the local bsd1 is “Sep 12 2004 16:04:34”
-
Fix the sanity limit and time correction problem:
Here’s what happened. A few minutes after Step 3, I got a connection refused:
 bsd1 /root> ntpq -p
 ntpq: read: Connection refused

 ... then this appeared in /var/log/messages:
Sep 12 16:08:58 bsd1 ntpd[134]: time correction of 21529 seconds exceeds sanity limit (1000); set clock manually to the correct UTC time.
 After reading a website:

  http://freeunix.dyndns.org:8088/site2/howto/NTP3.shtml

 Learned before starting ntpd, I should sync the time of the server a
 few times using ntpdate. This is to minimize the difference in time
 (offset) between the local server and the server(s) to sync with :
bsd1 /root> ntpdate -b 140.142.16.34 12 Sep 15:24:58 ntpdate[268]: step time server 140.142.16.34 offset 21528.515705 sec ```
The -b option adjusts the time immediately rather than slewing it.
HTTPD ServerName Lookup Problems
While my DSL and Internet connection was down, got the following error message during bootup:
    httpd: Could not determine the servers fully qualified domain name
    using 127.0.0.1 for ServerName
Also, “startx” hung for 5 minutes before starting. It displayed an error like this:
Bad Display 0: ...
Then, once X started, none of the applications would start.
The problem was the machine couldn’t find it’s DNS lookup. To fix it, had to add the static ip addr (192.168.1.49) and hostname.domain.com hostname (bsd1.mcmillan.com bsd1) to /etc/hosts:
::1                     localhost localhost.my.domain
127.0.0.1               localhost localhost.my.domain

192.168.1.1             mcmillan.com
192.168.1.49            bsd1.mcmillan.com bsd1
Note: The actual hostname of the machine must match the hostname in /etc/hosts. In this case, it’s “bsd1”. The domain name can be anything.
Sendmail Disable
During bootup, the sequence would hang (1-5 minutes) at the start of the sendmail daemons.
Put this in /etc/rc.conf to halt all sendmail related services from starting during boot up:
sendmail_enable=”NONE”
Fonts
a. Summary
To set the font family and size for Emacs, edit the ~/.Xdefaults file
to include the “emacs.font:
emacs.font:-sony-fixed-medium-r-normal--16-150-75-75-c-80-iso8859-1
For xterm, font settings go in ~/.Xdefaults also:
xterm*font: -sony-fixed-medium-r-normal--24-230-75-75-c-120-iso8859-1
In general, the pixel number (in this case 16) is the overall important size parameter.
Use the “xlsfonts” command to display the loaded fonts (-fn) on my system that are fixed-width-fonts (m or c). The more stylish fonts, such as sony-fixed are ‘c’ fonts:
     xlsfonts -fn '*-*-*-*-*-*-*-*-*-*-*-m*'
     xlsfonts -fn '*-*-*-*-*-*-*-*-*-*-*-c*'
b. Font Background
Under X, each font has a long name consisting of eleven words or numbers, separated by dashes. Some fonts also have shorter nicknames–9x15 is such a nickname. You can use either kind of name. You can use wildcard patterns for the font name; then Emacs lets X choose one of the fonts that match the pattern. Here is an example, which happens to specify the font whose nickname is 6x13:
emacs -fn "-misc-fixed-medium-r-semicondensed--13-*-*-*-c-60-iso8859-1" &
You can also specify the font in your .Xdefaults file:
emacs.font: -misc-fixed-medium-r-semicondensed--13-*-*-*-c-60-iso8859-1
A long font name has the following form:
     -maker-family-weight-slant-widthtype-style...
     ...-pixels-height-horiz-vert-spacing-width-charset
maker This is the name of the font manufacturer.
family This is the name of the font family–for example, courier.
weight This is normally bold, medium or light. Other words may appear here in some font names.
slant This is r (roman), i (italic), o (oblique), ri (reverse italic), or ot (other).
widthtype This is normally condensed, extended, semicondensed or normal. Other words may appear here in some font names.
style This is an optional additional style name. Usually it is empty–most long font names have two hyphens in a row at this point.
pixels This is the font height, in pixels. q
height This is the font height on the screen, measured in tenths of a printer’s point–approximately 1/720 of an inch. In other words, it is the point size of the font, times ten. For a given vertical resolution, height and pixels are proportional; therefore, it is common to specify just one of them and use * for the other.
horiz This is the horizontal resolution, in pixels per inch, of the screen for which the font is intended.
vert This is the vertical resolution, in pixels per inch, of the screen for which the font is intended. Normally the resolution of the fonts on your system is the right value for your screen; therefore, you normally specify * for this and horiz.
spacing This is m (monospace), p (proportional) or c (character cell).
width This is the average character width, in pixels, multiplied by ten.
charset This is the character set that the font depicts. Normally you should use iso8859-1. You will probably want to use a fixed-width default font–that is, a font in which all characters have the same width. Any font with m or c in the spacing field of the long name is a fixed-width font. Here’s how to use the xlsfonts program to list all the fixed-width fonts available on your system:
     xlsfonts -fn '*x*' | egrep "^[0-9]+x[0-9]+"
     xlsfonts -fn '*-*-*-*-*-*-*-*-*-*-*-m*'
     xlsfonts -fn '*-*-*-*-*-*-*-*-*-*-*-c*'
To see what a particular font looks like, use the xfd command. For example:
xfd -fn 6x13
displays the entire font 6x13.
Compiler
The GNU project C and C++ Compiler is installed on my system. Sometimes it is called GNU Make (or gmake).
See “man g++” and http://www.gnu.org/software/make/make.html
The C and C++ compilers are integrated. Both process input files through one or more of four stages: preprocessing, compilation, assem- bly, and linking.
CSH Shell
A Unix shell is an interface for controlling a Unix system. There are many different shells available. Some of them have similar syntax. Some of them vary in their syntax. The most commonly used Unix shells are SH(Bourne SHell), CSH(C SHell), RSH(Restricted SHell) and KSH(Korn SHell).
I’m using the TCSH (Enhanced C SHell).
I) setenv
To find out what shell I’m using:
bsd1 > echo $SHELL /bin/csh
If you are using CSH or some variant, the scripts executed at login will be .login and .tcshrc. These are situated in the users home directory described by the HOME environment variable.
If you are using CSH or some variant you can change environment variables temporarily from the command line using the following syntax:
setenv VARIABLENAME value_of_variable
The changes will remain in effect until you logout or invoke a new shell. If you would like to change an environment variable permanently you should edit the file .cshrc and insert the line:
setenv VARIABLENAME value_of_variable
The changes will come into effect the next time you login or invoke an instance of CSH if you cannot wait that long, you can type:
source .tcshrc
to put the changes into effect immediately. It can be useful to append to the end of an environment variable, this can be achieved using the following syntax at the command line and within .tcshrc:
setenv VARIABLE ${VARIABLE}:value_to_append
This will append :value_to_append to the end of the current value of the variable. In the example above the character ‘:’ has been placed between ${VARIABLE} and value_to_append, this is not mandatory but has been included to illustrate that this type of setting of environment variables which appends to the variable is often used to add a directory to a list of directories or a file to a list of files, when this is the case ‘:’ is the standard separator used.
II) PATH and LD_LIBRARY_PATH
Setting PATH and LD_LIBRARY_PATH for the tcsh shell Type the following to see if /usr/local/bin is in your path:
echo $PATH
If not then add the following line to the .tcshrc file in your home directory:
setenv PATH $PATH:/usr/local/bin
Then type the following to see if /usr/local/lib is in your library loading path:
echo $LD_LIBRARY_PATH
If not then add the following line to the .tcshrc file in your home directory:
setenv LD_LIBRARY_PATH $LD_LIBRARY_PATH:/usr/local/lib
Use a “:” between multiple entries:
setenv LD_LIBRARY_PATH /usr/xalan/Xalan-C_1_8_0-redhat_72_64-ecc_71/lib:/usr/xerces/xerces-c_2_5_0-redhat_72_64-ecc_71/lib
III) Shell docs
http://www.nscp.umd.edu/shells.html
SMTP
http://josefsson.org/smtpmail.html
vi recover sessions
While booting I get the message “recovering vi editor sessions” and the booting process is halted for a couple of minutes. I’m new to FreeBSD so I don’t know where to look. Booting is resumed and some time later I get a message that sendmail is starting – again taking a long time …
Any ideas how to fix this?
The saved sessions are (by default) in “/var/tmp/vi.recover”. If you don’t need to recover the sessions, clean the directory out.
Also, if the first one or two DNS server entries are not working you will see this behavior
FreeBSD Newbie Sites
http://bsdvault.net/
http://lantech.geekvenue.net/chucktips/jason/chuck/index_html
http://freebsdaddicts.org/
http://freebsdhowtos.com/
http://elibrary.fultus.com/technical/index.jsp?topic=/com.fultus.freebsd/index.htm l
Network Printing
Put this in /etc/printcap:
lp|hp2610:
       :sh:
       :lp=:rm=192.168.1.102:rp=RAW:
       :sd=/var/spool/output/hp2610:
       :lf=var/log/lpd-errs:
Then do this:
bsd1 /root> cd /var/spool/output/
bsd1 /var/spool/output> mkdir hp2610
bsd1 /var/spool/output> chown bin hp2610
bsd1 /var/spool/output> chgrp daemon hp2610
bsd1 /var/spool/output> chmod 775 hp2610
User Accounts
Use adduser and rmuser.
Prior to Release 10.x, the pw utility was used. See man pw.
usage:
| pw [user | group | lock | unlock] [add | del | mod | show | next] [help | switches/values] |
To display the user named ‘greg’:
$ pw user show greg
greg:*:1000:1000::0:0:Greg McMillan:/home/greg:/bin/sh
http://www.bsdguides.org/2004/managing-usersgroups-with-pw/
To add a user:
$ pw user add della -d /usr/home/della -s /bin/sh -m
$ pw user show della
della:*:1002:1002::0:0:User &:/usr/home/della:/bin/sh
To add a user’s password (must do as root):
$ passwd della
Changing local password for della.
New password:
To change greg’s shell to csh then copy over the startup script:
$ pw user mod greg -s /bin/csh
$ cp .tcshrc ~greg
To remove a user:
$ pw user del della
o Add User
$ adduser -silent
o Add User to Group
$ vi /etc/group
Then, add the username to the appropriate group line. Adding users to wheel grants “su root” access:
wheel:*:0:root,greg

$ id
uid=1000(greg) gid=1000(greg) groups=1000(greg)
$ su root
Password:
bsd1 /usr/home/greg>
bsd1 /usr/home/greg> id
uid=0(root) gid=0(wheel) groups=0(wheel), 2(kmem), 3(sys), 4(tty), 5(operator), 20(staff), 31(guest)
o Test login
$ exit
$ login: user
$ password:
$ id
o Error: Usernames must match regulare expression:
When I type adduser, I get:
> Usernames must match regulare expression: [greg mcmillan]:
The first time you run adduser it prompts you to enter the default settings you want it to use in future (here you’ve chosen to allow only usernames that contain the characters “greg mcmillan” - probably not what you wanted).
The best thing to do would be to do:
mv /etc/adduser.conf /etc/adduser.conf.bak
and then run adduser as root again, but this time run it as:
adduser -silent
This will stop adduser from asking you for defaults and instead will work it out from it’s default settings.
motd
Message of the Day (MOTD)
greg-pc# cat /etc/motd
spkrtest
Tests the onboard speaker:
$ spkrtest
You have no write access to /dev/speaker or the speaker device is not enabled
in kernel. Cannot play any melody! See spkr(4).
-
Select the melody I want to play.
If it doesn’t work, I’ll get this message:
Sorry, cannot play any melody!!!
To set up my sound-card capabilities:
-
Read the BSD Handbook
-
Inspect /var/log/messages from the last time I booted. Check out what the device probe stuff said about any kind of sound capabilities that it found when it was coming up.
uptime
Show how long system has been running:
$ uptime
 7:53AM  up  3:29, 1 user, load averages: 0.00, 0.00, 0.00
Network traffic per interface
$ systat -ifstat 1

                    /0   /1   /2   /3   /4   /5   /6   /7   /8   /9   /10
     Load Average   |||||||

      Interface           Traffic               Peak                Total
            lo0  in      0.000 KB/s          0.000 KB/s            1.301 KB
                 out     0.000 KB/s          0.000 KB/s            1.301 KB

           sis0  in      0.000 KB/s          0.707 KB/s           89.165 MB
                 out     0.137 KB/s          0.539 KB/s            2.062 MB